Skip to content
PRESCHOOL PORTRAIT
Self portrait for preschoolers.
— By Julie Hodos on September 14, 2024; Updated on October 27, 2025.

This post may contain affiliate links. Please refer to our disclosure policy.
Creating a self portrait is a big deal for anyone, but for preschoolers, it’s a whole new adventure! Drawing a face with the right proportions—like getting the eyes, nose, and mouth in just the right spots—is tough, even for grown-ups. Did you know that the eyes are typically halfway between the top and bottom of the head? Or that a line from the corner of your eye to your ear usually hits the top of the ear?
These little details are fascinating but way too technical for little ones just starting out. That’s why this self portrait for preschoolers activity is designed to be super simple, super fun, and super creative with a cut-and-paste approach. No drawing skills needed—just imagination and a glue stick!
Table of Contents

This activity lets preschoolers explore their ideas about where facial features belong without worrying about sketching perfect circles or straight lines. The printable templates for the head and facial features make it easy for kids to focus on creativity rather than technical skills. The result? A delightful, usually Picasso-inspired masterpiece that’s a perfect keepsake for parents and a great way to see how your child’s understanding of faces evolves over time.
This self portrait for preschoolers activity is part of a week-long lesson plan centered around the theme Nn is for Nose and the five senses. It’s packed with free printables, coloring pages, and other creative activities to make learning fun. Want to dive into the full Letter of the Week curriculum? Check out the Letter of the Week resources for more details!
Why Are Portraits So Tricky?
Faces are familiar, yet surprisingly hard to get right. Even adults struggle with capturing the right proportions, and for kids, it’s a whole different ballgame. Our brains love to play tricks on us, filling in gaps based on what we think a face should look like rather than what’s actually there. For preschoolers, this is especially true. Their little minds are still figuring out the world, and their assumptions about faces can lead to some adorably quirky results.
For example, because hair covers part of the head and the crown is often hidden, kids tend to place the eyes way up high on the forehead. Noses are tricky too—without clear, defined lines, they’re tough to place correctly. When my 3-year-old, Mick, tried this activity, he stuck the nose on upside down! My 5-year-old, ever the big brother, pointed it out, and Mick flipped it around, though I secretly loved the quirky, abstract vibe of his original orientation.
Also, ears are another surprise—most kids don’t realize how low they sit on the head. And hair? It’s often drawn or placed incorrectly because kids usually start with the eyes (on the forehead, of course!) and work from there. This activity is all about letting kids explore these assumptions in a pressure-free way. By using pre-cut facial features, they can focus on placement and creativity, not perfection. The result is a unique self portrait that captures their personality and their current understanding of faces.

Setting the Stage with Fun and Learning
Before jumping into the craft, set the mood with some engaging activities to get your preschooler excited. Reading a book, sharing a poem, or singing a song can make the experience more memorable and tie it into the theme of faces and the five senses.
Here are a few ideas to kick things off:
- Read a Book: Try The Shape of Me and Other Stuff by Dr. Seuss. Its playful exploration of shapes and individuality is perfect for getting kids thinking about their own features.
- Share a Poem: Be Glad Your Nose is on Your Face by Jack Prelutsky is a giggle-inducing poem that celebrates the quirks of facial features. My boys couldn’t stop laughing when we read it!
- Sing and Dance: Get moving with Head, Shoulders, Knees, and Toes. It’s a classic that helps kids identify body parts (including those all-important facial features) while burning off some energy. We did all three—book, poem, and song—and it was the perfect warm-up for our craft time.
These activities not only make the lesson fun but also help preschoolers connect the idea of faces to their own bodies. After dancing out the wiggles, they’ll be ready to sit down and create their self portrait for preschoolers.

The Cut-and-Paste Self Portrait Activity
This activity is designed to be straightforward and accessible for 3- to 5-year-olds. It’s all about giving kids the freedom to explore and create without the stress of drawing. Here’s how to do it, step by step:
Step 1: Preparation and Planning
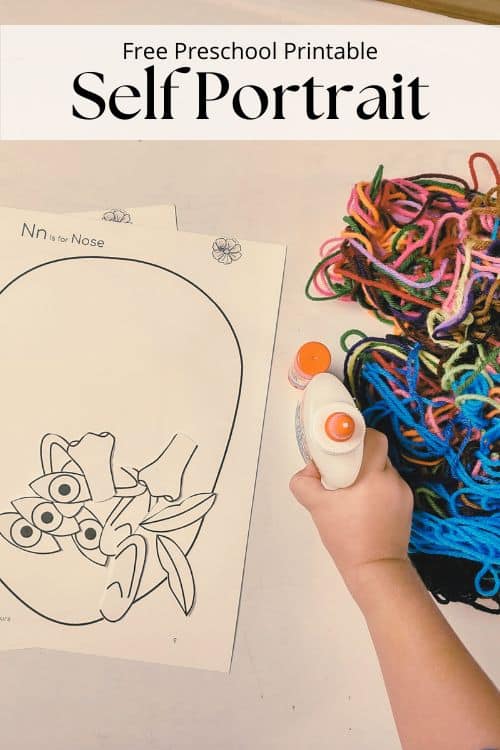
Start by gathering your materials. You’ll need the printable templates for the head and facial features (available at the bottom of this post), some colored paper or cardstock, scissors, glue sticks, crayons or markers, and yarn or paper strips for hair. I’ve used all sorts of colors for the paper—green, yellow, blue, you name it! This time, I printed everything on white cardstock, which let my boys get extra creative with their coloring.
Depending on your child’s age and scissor skills, you may want to pre-cut the facial features. For my 3- and 5-year-olds, I cut everything out ahead of time to keep things simple and avoid any frustration. Once you’re ready, set up a workspace at the table and hand your child the blank head template. Let them take the lead on placing the facial features—eyes, nose, mouth, and ears—before gluing anything down. This planning phase is key because it lets you see their natural assumptions about where things go.
Watching my boys place the features was so telling. Mick, my 3-year-old, was all about the abstract look, plopping the eyes high on the forehead and the nose in a totally unexpected spot. My 5-year-old, Marty, was a bit more deliberate, adjusting things as he went, curious why the placement didn’t look quite right. It’s fascinating to see how their minds work!

Step 2: Paste and Color
Once your child is happy with their feature placement, hand over the glue stick and let them secure everything in place. You might notice them tweaking things as they go—my boys moved the eyes and nose around a bit, trying to figure out why something looked “off.” It’s all part of the learning process, and it’s amazing to watch them problem-solve.
After gluing, it’s time to color! Depending on how much glue your child used, you may want to let the paper dry first to avoid tears (in the paper, not their eyes!). Mick went to town with a marker, and somehow his glue-heavy portrait survived. Marty used crayons and colored gently, which worked out fine. If your kids are as impatient as mine, you can always do another round of Head, Shoulders, Knees, and Toes to keep them occupied while the glue dries.
Encourage them to add their own flair—maybe some rosy cheeks, freckles, or even wild eyebrows. This is where their personality really shines through. The goal isn’t a perfect portrait but a reflection of how they see themselves and the world around them.

Step 3: Add the Hair
Hair is where things get really fun! You can use yarn, paper strips, or even let your child draw it on. Ask them if they want short, long, curly, or straight hair. Mick went for a wild, abstract style, while Marty opted for something a bit more realistic. Let their creativity lead the way—there’s no right or wrong here.
Once the hair is glued or drawn on, set the portrait aside to dry on a flat surface. This prevents the yarn or paper strips from sliding off. When it’s ready, you’ve got a masterpiece worthy of the fridge, an art wall, or even a special portfolio.
Turning It Into a Five Senses Labeling Activity
To make this self portrait for preschoolers even more educational, you can easily transform it into a five senses labeling activity. This extension helps kids connect their facial features to the five senses—sight, smell, taste, touch, and hearing—while reinforcing vocabulary and observation skills. Here’s how to do it:
Step 1: Introduce the Five Senses
Before starting the labeling activity, talk about the five senses in a way that’s relatable for preschoolers. You can say something like, “Your eyes help you see the bright colors in your picture. Your nose helps you smell yummy cookies. Your mouth helps you taste them!” Keep it simple and fun, using examples from their everyday life.
To make it interactive, try a quick sensory game. For example:
- Sight: Hold up a colorful toy and ask, “What do you see with your eyes?”
- Smell: Let them sniff a piece of fruit or a spice and ask, “What does your nose smell?”
- Taste: Talk about eating cookies versus pickles, and how their mouth helps them taste the difference.
- Touch: Have them touch something soft, like a blanket, and describe how it feels. Then compare to touching sandpaper.
- Hearing: Make a silly sound or play a note on a toy instrument and ask, “What do your ears hear?”
This sets the stage for connecting the senses to their self portrait.
Read Next: 5 Senses Activities for Kids

Step 2: Label the Senses
Once the self portrait is complete (with facial features and hair in place), provide small labels or strips of paper with the words “See,” “Smell,” “Taste,” “Hear,” and “Touch.” If your child isn’t reading yet, you can read the words aloud or use simple symbols (like an instrument for “hear”) to make it accessible.
Ask your child to match each sense to the correct facial feature:
- See: Place this label near the eyes.
- Smell: Place it near the nose.
- Taste: Place it near the mouth.
- Hear: Place it near the ears.
- Touch: This one’s a bit trickier since it involves the whole body, but our skin in general feels so placing near the cheeks is perfect to represent touch.
If your child is younger, guide them by asking questions like, “Which part of your face lets you know something is stinky?” For older preschoolers, let them try matching the labels on their own. Marty loved this part, proudly sticking the “Smell” label by the nose, while Mick needed a bit more prompting but got the hang of it with some giggles.
Step 3: Talk and Explore
As they place the labels, talk about how each sense works. For example, “Your nose helps you smell the yummy pancakes we had for breakfast. What else do you like to smell?” This encourages them to think about their senses in a real-world context. You can also ask them to point to their own facial features and say what they do, reinforcing the connection between the portrait and their body.
Read Next: 5 Senses for Kids in Nature
Step 4: Reflect and Display
Once the labels are in place, take a moment to admire their work. Ask, “What’s your favorite sense to use?” or “What’s something fun you saw with your eyes today?” This helps them reflect on the activity and builds their vocabulary.
Display the labeled self portrait alongside their other artwork. Not only does it show off their creativity, but it also serves as a reminder of what they’ve learned about the five senses. My boys loved seeing their portraits on the fridge.

Free Printable for Self Portrait Activity
To make this self portrait for preschoolers activity as easy as possible, I’ve created a free printable template that includes a blank head outline and facial features (eyes, nose, mouth, and ears). You can download it below and print it on your choice of paper—white cardstock works great for coloring, or try colored paper for a fun twist. The printable is designed to be simple, so your child can focus on creativity and placing the features where they think they belong.
Why This Activity Matters
This self portrait for preschoolers activity, with or without the five senses extension, is more than just a craft—it’s a window into your child’s mind. Their placement of facial features reveals how they perceive faces, and the creative choices they make show off their unique personality. Adding the five senses labeling component takes it a step further, helping them understand how their body works while building vocabulary and critical thinking skills. Plus, it’s a fantastic keepsake to see how their skills and understanding grow over time.
In our house, these portraits get prime real estate on our art wall for a few months before being tucked into their Letter of the Week portfolio. Years from now, I’ll pull them out to show my kids how their early assumptions about faces—like those forehead-high eyes—evolved as they learned more about proportions and observation.
Tips for Success
To make this portrait activity a hit with your preschooler, keep these tips in mind:
- Keep It Fun: Let your child take the lead. If they want to put the nose where the ear should be or label the mouth as “Hear,” go with it! The goal is creativity and exploration, not perfection.
- Be Patient: Younger kids may need help with cutting, gluing, or understanding the senses, but give them as much independence as possible. It builds confidence and fine motor skills.
- Talk It Out: Ask questions as they work, like “Why did you put the eyes there?” or “What does your nose help you smell?” This sparks conversation and helps them think about their choices.
- Celebrate the Result: No matter how abstract the final portrait or how creative the labeling, praise their effort and display it proudly. It’s a boost to their self-esteem and a reminder of how special their creativity is.

Connecting to Art History
Since this activity often produces Picasso-inspired results, why not take it a step further and introduce your child to the famous artist? Read a simple book about Pablo Picasso’s life or look at some of his abstract portraits together. Talk about how he played with shapes and features to create unique, imaginative art. It’s a great way to show your child that their mistakes are actually creative choices, just like Picasso’s! You can even tie this to the five senses by pointing out how Picasso’s abstract faces might make you see things differently.
You could compare their self portrait to one of Picasso’s works, noting similarities in the playful placement of features. Overall, this is a fun way to connect their art to the wider world of creativity.
Expanding the Activity
Want to take this self portrait for preschoolers to the next level? Here are some ideas to extend the fun:
- Make a Family Portrait Gallery: Have everyone in the family create a cut-and-paste self portrait, then display them together. It’s a great way to celebrate everyone’s unique style and sensory connections.
- Add a Background: Provide a larger sheet of paper and let your child draw or paste a background for their portrait—maybe their favorite place or objects related to the senses, like a sun for sight or a cake for taste.
- Explore Textures: Use materials like tissue paper, fabric scraps, or cotton balls for hair or other features to add a tactile element that ties to the sense of touch.
- Try a Mirror: Set up a small mirror for your child to look at while placing features and labeling senses. It’s a fun way to encourage observation, even if the results are still delightfully abstract.

A Keepsake for the Future
Every time I look at my boys’ self portraits, complete with their quirky feature placements and five senses labels, I’m reminded of how quickly they grow and how their perspectives change. That upside-down nose or the “See” label proudly stuck by the eyes are snapshots of their little minds at work. As they get older and learn more about drawing, proportions, and the senses, their portraits will become more accurate and literal. These early creations are pure magic to see and remember the beauty and innocence of childhood.
This activity is a wonderful way to capture a moment in time while fostering creativity, confidence, fine motor skills, and sensory awareness. Whether you’re doing it as part of the Nn is for Nose theme or just for a rainy-day activity, your preschooler will love creating their self portrait for preschoolers and exploring the five senses.
If you try this activity, I’d love to hear about it! Share your child’s funny or creative facial feature placements or how they labeled their senses in the comments. Did they put the ears on the chin? Label the nose as “Taste”? Every portrait tells a story, and I can’t wait to hear yours!
Self Portrait for Preschoolers
AT A GLANCE ACTIVITY INSTRUCTIONS
Materials
- Included printable
- Glue stick
- Elmer’s glue
- Yarn
Instructions
- I recommend printing on different light colored pieces of paper (i.e. blue, yellow, pink) because once the cut outs are in place it will make them pop and the portrait will have a Picasso like feel.
- Cut out the eyes, ears, nose, and mouth
- Give your child the blank head printable and cut outs.
- Allow them to plan out where they plan to place the cut outs.
- Once they’re happy with their set up, give them the glue stick.
- Lastly, let them glue on yarn for the hair with the Elmer’s Glue.
Recent Posts on the Homeschool Blog