STAY COZY WARM
Easy tie blanket instructions for kids.
— By Julie Hodos on November 5, 2024; Updated on December 9, 2025.
This post may contain affiliate links. Please refer to our disclosure policy.
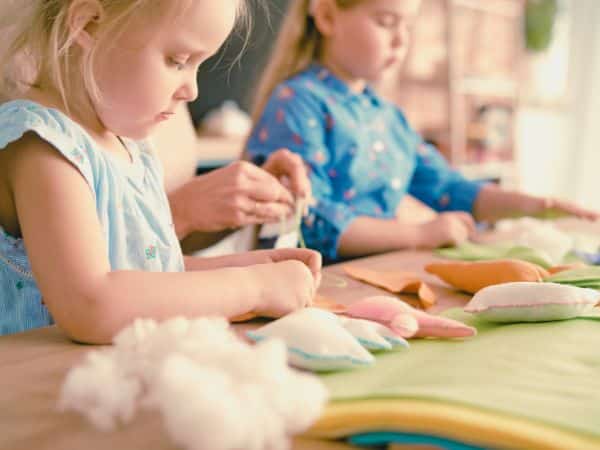
Winter is almost here, and what better way to welcome the chill than with a hands-on family project that keeps growing hands busy and hearts warm? My eldest, Marty (6), is a craft enthusiast—he’s even tried cross-stitch with a plastic canvas kit. When I suggested we make a blanket together, both he and his brother Mick (4) were all in and we had a blast, with a few modifications. As we’ve revisited the activity over time, I’ve found it’s perfect for older kids but younger ones can still participate and feel all the feels!
Table of Contents
Working with a 6 and 4-year-old meant the tie blanket project took a couple hours (spread over a couple of afternoons). At the end of it, we had a soft, colorful tie blanket perfect for snuggling during early-morning story time, movie night, or even outdoor picnics when the weather allows. The beauty of this craft is its simplicity: no needles, no sewing machine, just pure, tactile fun that results in something everyone can use and cherish.
You can create the same magic at home with kids ages 4 and up. Below are detailed tie blanket instructions with tips and tweaks for every age. We’ll dive deeper into fabric choices, age-specific adaptations, and even ways to tie this into seasonal themes. Whether you power through in one cozy afternoon or stretch it across a week of evenings, the result is a useful, beautiful keepsake you’ll reach for all winter long. And if you’re new to family crafting, don’t worry -this project is as forgiving as it is rewarding, with plenty of room for creativity and learning along the way.

Why Make a Tie Blanket?
We read hours of picture books together every week, so crafting something we can actually cuddle under feels like the ultimate win. Tie blankets build real skills across the different ages: younger kids strengthen grip and coordination through the repetitive motions, mid-range kids master the square knot (which boosts confidence and sets the stage for future shoelace independence), and older ones practice precision and even basic math like measuring strips. Siblings learn patience, turn-taking, and the quiet pride of teamwork. For families with a wide age gap, it’s a great equalizer: the 4-year-old can tie with help, while the 9-year-old experiments with knot variations or helps troubleshoot.
This project is also a lifesaver for parents who aren’t natural crafters. I’m picky -I love crafts that produce something useful or pretty, and ideally both. Tie blankets check every box with zero glue, zero mess, and zero random art that ends up in the recycling bin. Plus, the whole thing is inexpensive, two yards of fleece and scissors you already own. But let’s talk value -fleece is durable, washable, and hypoallergenic, making it ideal for households with allergies or pets.
Also, psychologically there’s something deeply satisfying about creating a comfort item from scratch; studies show hands-on activities like this reduce stress and build family bonds, especially during the shorter, darker days of winter when cabin fever sets in.
Perhaps you’ve made one and your child wants to continue making more because they enjoyed the activity and end result so much. But, you don’t need 5 new blankets in the house. It’s time to think beyond the home front, tie blankets make thoughtful gifts -think personalized versions for grandparents, teachers, or even charity drives.
Full Tie Blanket Instructions
Materials You’ll Need
Grab two pieces of fleece, each 1.5 yards (54 inches wide by 60 inches long before trimming). Choose prints that excite your crew -one solid color and one pattern is a foolproof combo, but consider textures too: anti-pill fleece for longevity, or plush minky for extra softness. Head to stores like Hobby Lobby, JoAnn Fabrics, or even Walmart for the best deals -watch for sales around holidays, where you might snag remnants for under $5 a yard.
If shopping online, read reviews for thickness; thinner fleece frays less but feels less luxurious. You’ll also need sharp fabric scissors (regular ones work in a pinch, but fabric shears glide through like butter, reducing hand fatigue for parents). A large, flat surface like a coffee table, dining table, or clean patch of floor is essential. Optional extras: a rotary cutter and mat for precise edges (great for 8-year-old’s and up to try under supervision) or washable markers/pencils for marking strips lengths.
For safety, parents should cut the fabric for kids 6 and under. Depending on your child, you can determine if they are trustworthy with the sharp fabric scissors if they’re 7 or older. Always supervise cutting closely.
Step 1: Prep the Fabric
Start by trimming away any stiff, printed edges -these are called the selvage and often have tiny holes or brand stamps. Sometimes the store clerk cuts a little crooked, so lay both pieces on top of each other and snip until the rectangles are exactly the same size -measure with a tape if your 7- to 9-year-old wants to practice math skills. Don’t toss the scraps; that random 8-inch strip from the end of the bolt became a mini throw pillow at our house, or use them for practice knots with younger kids.
Once the edges are neat, spread the bottom piece of fleece on your work surface with the right (pretty) side facing down. Place the second piece on top with its right side facing up, so the “wrong” sides are kissing in the middle. Smooth everything flat and from this point forward, treat the two layers as one -you’ll cut them together and they should never separate. If working with a wiggly kiddo, use painter’s tape on the edges to hold layers steady without residue.
This prep phase is a great teachable moment: explain how fleece is made from recycled plastic bottles, sparking chats about recycling. For themed blankets, now’s the time to decide orientation -does the pattern run horizontally or vertically?
Step 2: Cut the Corners & Fringe
Pick any corner and cut a square that’s 5 to 6 inches on each side, slicing straight through both layers of fleece. A 5-inch square gives deeper, cozier fringe. A 6-inch square may be easier for smaller hands to tie without frustration. Repeat at the other three corners so you have four missing squares -count them aloud with 4-year-olds for number practice. Now, working from one cut-out corner, slice strips toward the center of the blanket. Make each strip 1 to 2 inches wide and exactly as deep as your corner square (5 or 6 inches).
Narrower 1-inch strips create a tighter, more polished look that appeals to a detailed oriented 8 year old; wider 2-inch strips are kinder to 4- and 5-year-old fingers, keeping tears at bay over tricky knots. The width will also determine how many knots need to be tied to reach a finished product, but I wouldn’t go much wider than 2, 2.5 inches.
The smartest way to tackle this with a mixed-age crew is one side at a time. Cut the corner square, slice the fringe along that entire side, then pause and let the kids start tying. While they work, move on to the next corner and side. This keeps the project forgiving -if the layers shift or you need to stop for snacks, only one side is affected, and there’s no stress about lining up pre-cut strips later.
Feel free to eyeball the width of each strip; fleece is wonderfully forgiving, and slight wobbles disappear once everything is knotted. For older kids, introduce a ruler: have them mark every inch with a washable marker, turning cutting into a measurement lesson.
Step 3: Tie the Knots (The Heart of the Project)
Sit cross-legged on the floor with your youngest in your lap for the first side -it gives you gentle control, plus it models patience for siblings. Pick up one pair of matching strips, one from the bottom fleece and one from the top. Hold the bottom strip straight up like a tree trunk. The top strip is the bunny. Tell the story slowly: the bunny runs around the tree, finds the little den (the loop created by circling the tree), and dives inside.
Next, pull the ends to snug the knot, then repeat the exact motion a second time to lock it in place. That’s a square knot—the same motion kids will use for shoelaces someday, and a foundational skill for camping or sailing later in life.
Demonstrate three or four times, narrating every step so the rhythm sticks. After the demo, guide your child’s hands through the first few knots, helping them spot the “den” each time. By the middle of the first side, most 4 year old was tying on his own with supervision; 6 and up often master it after one demo and can work independently. Since I have boys, my eldest was all for seeing how quickly he could tie.
Step 4: Work Side by Side (Literally)
If you have two kiddos working in tandem, like I did, have them both work from each end to the center. My eldest worked fastest but also has a longer attention span so the amount of work divided out evenly for their ages.
Stamina will vary based on age. A 4-year-old may need a snack break after 10 knots while a 7-year-old might power through a whole side, and a 9-year-old will volunteer to finish solo or teach a younger sibling. No worries if the tie blanket needs to take a rest. Fold the half-finished blanket, slide it into a basket, and pick it up again later in the day or tomorrow; this flexibility is key for not overtasking your child and keeping the joy alive.
When you’re working on the tie blanket you can keep energy high by playing soft music or audiobooks. The beauty of fleece is that it hides imperfections, so there’s zero pressure to finish in one sitting -embrace the process as much as the product.
Step 5: Snuggle & Celebrate
Your blanket is officially done when every pair of fringe is double-knotted. Give it a gentle shake to fluff, then grab a book and snuggle together underneath for instant gratification. Spread it on the living-room floor for a picnic read-aloud or wrap the kids like burritos for photos to showcase their hard work. Drape on the back of the couch when finished to display the beautiful tie blanket proudly. The blanket is machine-washable (cold water, gentle cycle, air dry to preserve fluff) and gets softer with every wash, making it a staple for years to come.

Recommended Books
Cuddle under your new creation and dive into stories that celebrate the art of blanket/quilt making. These picture books highlight patience, family history, and the love stitched into every patch, with themes that resonate across ages.
The Quiltmaker’s Gift by Jeff Brumbeau, illustrated by Gail de Marcken – A generous quiltmaker teaches a greedy king the joy of giving through her breathtaking creations.
The Patchwork Quilt by Valerie Flournoy, illustrated by Jerry Pinkney – Tanya watches her grandmother turn scraps of family clothing into a memory-filled quilt, learning that every piece tells a story.
The Quilt Story by Tony Johnston, illustrated by Tomie dePaola – A single quilt comforts two little girls in different centuries, showing how love and warmth travel through time.
Read these selections aloud leading up to making your tie blanket to inspire and motivate your child. Since a quilt takes a lot more precision and skill than an easy tie blanket, this craft is a great substitute to the quilts highlighted in the stories. A warm, cozy blanket is still achieved for even the youngest learners. After the tie blanket is complete, snuggle underneath to revisit the stories that originally inspired your kiddo to tackle this cozy craft.

Troubleshooting & Variations
Strips won’t line up perfectly. No problem -fleece is stretchy. Trim the longer strip shorter with a quick snip and knot anyway. The finished edge hides everything.
Knots are too tight or too loose. Teach the phrase “snug, not strangled.” If a knot is choking the fabric, slide a pencil tip or chopstick under the loop and wiggle to loosen. Too loose? Have the child re-tie just that pair while you hold the strips taut. Ages 6 and up can troubleshoot their own knots with a little guidance, building independence.
Little hands get tired or frustrated. Set a timer: 10 minutes of tying, 10 minutes of free play, repeat. Younger kiddos especially appreciate the break but before tears flow, hug it out and resume tomorrow -remind them mistakes make masters.
Someone cuts a strip too deep or too shallow. Celebrate the “design feature.” Shallow strips become decorative tabs; extra-deep strips can be trimmed or double-knotted higher up. Fleece doesn’t fray, so mistakes stay put without unraveling the whole project.
Fabric bunches or wrinkles during cutting. Smooth it out mid-process -have kids “iron” with their hands. If persistent, weigh corners with books.
Want a bigger blanket? Buy 2 yards of each fleece for a generous 60 x 72-inch throw (perfect for growing kids or full-family snuggles). Same steps, just more knots, older kiddos are able to focus in and finish the slightly bigger project easily.
Want a smaller practice blanket? Cut 1-yard pieces for a 36 x 40-inch doll/lap size. Great for younger kiddos to finish in one sitting and gift to a stuffed animal or doll.
Add a third layer for warmth. Slip a flat sheet of batting between the fleece layers before cutting fringe. Cut the batting 5 inches smaller all around so it stays hidden inside the tied edge. The blanket becomes a lightweight quilt—perfect for car trips or camping simulations in the backyard. If you choose this option, the batting will need to be sewn down (just like on a quilt) otherwise when you inevitably need to wash the tie blanket the batting will move and it will be impossible to flatten your blanket again.
Stretch the project over a week. Day 1: shop and trim (field trip fun). Day 2: cut and practice tying knots on one side. Day 3: second side with music. Day 4: finish and wash.
Themed variations for seasons. For Halloween, use spooky prints and add felt bats tied into fringe. Christmas? Red-and-green with jingle bells. Summer camp? Camo fleece for “survival blankets.” Adapt to holidays for nostalgic fun that adds to the holiday season.
Pet-friendly tweaks. Scale down for dog beds (1-yard pieces), using washable, chew-resistant fleece. Kids learn pet care by customizing with paw prints.
More Easy “Sewing” Projects
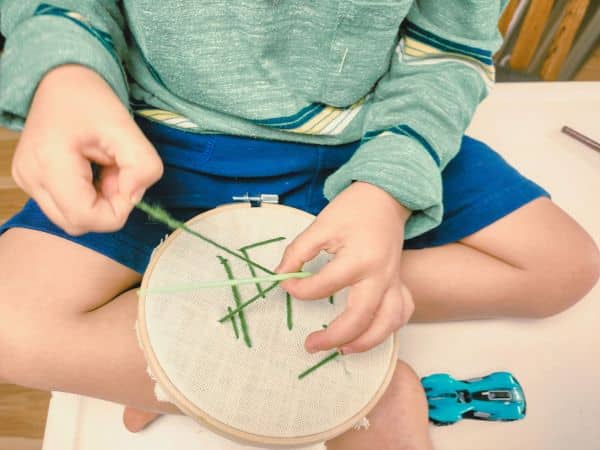
Once the tie blanket bug bites, keep the needle-free stitching fun rolling with these low-mess, high-reward ideas, progressing from simple to more involved:
Plastic Canvas Cross-Stitch Kits – Start with pre-cut plastic grids and blunt yarn needles. Younger kiddos manage big stitches on animal shapes while ages 6 and up tackle bookmarks, coasters, or ornaments with finer details. Look for kits with simple patterns (hearts, stars, dinosaurs) that are printed on the canvas. These are great for holiday gifts.
Fleece Pillowcases – Cut two 20-inch fleece squares, fringe the edges exactly like the tie blanket, and tie three sides. Stuff with a thrift-store pillow form or old clothes.
No-Sew Fleece Scarves – Cut a 6 x 60-inch strip, fringe the short ends 6 inches deep, and tie each pair into a mini knot. Add jingle bells to a few strips for sound effects; teach 7-year-olds to measure evenly.
Lacing Cards – Punch holes around cardboard shapes (cereal box backs work). Kids “sew” with shoelaces or yarn taped at the end. Younger kiddos practice grip on large holes while older ones can design their own cards with intricate borders.
Burlap & Blunt Needle Sewing – Stretch burlap in an embroidery hoop for stability. Use plastic tapestry needles and thick yarn to stitch running lines, initials, or abstract pictures. The loose weave forgives wobbles; start with “sew your name” for pride.
Yarn-Wrapped Letters – Cut cardboard initials (or full names for ambitious 9-year-olds), wrap tightly with colorful yarn. Secure ends with tape or glue dots. Hang on bedroom doors or above beds.
Fleece Headbands or Bracelets – Cut narrow strips, braid three together, and tie ends. No tools needed beyond scissors..
Stock a “stitching basket” with fleece scraps, plastic needles, yarn snippets, felt squares, and recycled materials. Allow your child to have access to this basket all winter for whenever the creative bug strikes.
Your Turn!
Will you conquer your tie blanket in one snowy afternoon or spread the love across a couple evenings? Drop a comment to share: How old are your helpers? Did the bunny-and-tree trick click?
Winter crafting doesn’t get cozier than this. Gather your fleece, warm up the cocoa, and let those growing fingers tie memories that will keep you warm for years. Happy knotting!
Tie Blanket Instructions
AT A GLANCE ACTIVITY INSTRUCTIONS
Materials
- 1.5 yards of each Fleece fabric – 2 different patterns (or 1 solid, 1 pattern)
- Scissors
Instructions
- I think it is important to include your child in the entire process so take them with you to the store to purchase the fabric and let them choose from the fleece options.
- Once you have your two fabrics at home. Lay them on top of each other. Be sure the wrong sides are facing each other. Keep the fabric together for all the cutting. When you cut, you should always be cutting two fabrics.
- Use fabric scissors (preferred). You’ll need to do this step because they’re very sharp. Begin by cutting off squares on each corner. The sides on the squares should be 5-6 inches.
- Now cut the fabric edges into strips – the same length deep as the square. Each strip should be about 1-2” thick. You can eyeball it or use a ruler. The edge of your fabric will now have a fringe.
- Now is the time to show your child how to tie the knots. It’s relatively simple if you look up a video but your child will wrap it around their finger and push the ends through the hole they just created.
- Pull tight.
- You can work on this over a few days because attention spans may be too short to do this all in one sitting.
Recent Posts on the Blog