JELLYFISH & SCISSORS
Preschoolers practicing scissor skills.
— By Julie Hodos on August 1, 2024; Updated on January 6, 2026.

This post may contain affiliate links. Please refer to our disclosure policy.
Have you ever attempted to teach your preschooler the basics of using scissors, only to encounter hesitation or frustration? Or perhaps your little one simply needs more opportunities to practice this essential fine-motor skill? If either of these scenarios resonates with you, then this engaging activity is perfect for sharing with your 3- to 5-year-old. By combining creative watercolor painting with hands-on scissor practice, you’ll transform what could be a challenging task into a delightful, play-based learning experience that captivates their imagination and builds their confidence.
Table of Contents

Why Practice Scissor Skills?
Scissor practice, along with other fine-motor activities, plays a crucial role in preschoolers’ development, and it’s something that can easily be incorporated into everyday home routines. If your child has previously shown reluctance toward using scissors, this project might just spark their interest through the allure of creating a vibrant watercolor masterpiece. Once they’ve painted their jellyfish, they’ll be eager to add realistic tentacles by cutting them out, mimicking the graceful movements of a real sea creature. The key to success lies in fostering a genuine desire to practice these skills. When you frame a potentially difficult activity as playful and artistic, your child becomes an enthusiastic participant rather than a reluctant one.
To make things even more accessible, I’ve included a free printable at the bottom of this post. It features two versions of the jellyfish: one with straight lines for the tentacles, ideal for beginners, and another with wavy lines to provide a gentle challenge for those with a bit more experience. This scissor skills activity is specifically designed for preschoolers, blending art and skill-building in a way that’s both educational and fun.

Building Interest: Captivating Your Child with the World of Jellyfish
Why Motivation Comes First
Children will willingly practice a hard skill (like using scissors) when they are emotionally invested in the outcome. A plain worksheet with lines gets ignored or rushed. A watercolor jellyfish that they painted themselves? They will meticulously focus to cut the tentacles on their lines as “perfect” as possible.
The secret is to spend at least a day (or even a whole week) immersing them in the magical world of jellyfish and ocean life before you ever bring out paint or scissors. The more they know and love jellyfish, the more motivated they will be.
Read Next: Ocean Activities for Kids
Picture Books That Make Jellyfish Irresistible
Here are our family’s absolute favorites, pick them up at your local library or grab from a used, online bookstore.
- Peanut Butter & Jellyfish by Jarrett J. Krosoczka A sweet friendship story starring a jellyfish and a seahorse. Funny, colorful, and perfect for ages 2–6.
- The Thing About Jellyfish by Ali Benjamin (picture-heavy edition or just show the illustrations) Technically a middle-grade novel, but the watercolor-style illustrations of jellyfish are breathtaking and captivate even 3-year-olds.
- The Pout-Pout Fish by Deborah Diesen A cheerful rhyming underwater adventure about turning frowns upside down. Perfect for ages 2–6.
- Over in an Ocean: In a Coral Reef by Marianne Berkes A sing-to-the-tune-of “Over in the Meadow” book that includes jellyfish and many other sea creatures.
- Hello, World! Ocean Life by Jill McDonald One spread is dedicated to jellyfish and their graceful movements.
- Jellies: The Life of Jellyfish by Twig C. George Slightly longer, but the photos are mesmerizing and it’s excellent for 4–6-year-olds who want “real facts.”

Preschool Watercolor Art: Introducing a New Medium
Now that your child is intrigued by jellyfish, it’s time to introduce watercolor painting, an art form they may or may not have tried before. I recommend scheduling this painting session the day before the scissor practice to avoid overwhelming their small hand muscles. Fine-motor skills require consistent repetition and ample time to strengthen, so spacing out the activities prevents fatigue and ensures better results.
If you’re looking for ways to preserve your child’s artwork after projects like this, check out my related post on Artwork Storage Solutions for practical ideas.
Setting up the art station is straightforward and inviting. Gather your supplies: a cup of water, paper towels, paintbrushes, watercolor paints, and some practice paper. I highly recommend using child-friendly watercolor sets like the ones from Sargent Art or Prang, which are vibrant and easy to handle. To make the experience even more special, prepare enough materials for yourself to join in—children love observing and imitating their parents as they explore new techniques.
Begin by allowing your child to experiment on a separate sheet of paper, such as one of the jellyfish coloring pages from the Jj is for Jellyfish pack. This practice round is essential because beginners often create unintended holes in the paper from over-wetting or scrubbing too hard. By addressing these common mistakes early on a scrap sheet, you can guide them gently and prevent mishaps on the main printable.
Demonstrate the process step by step: Show them how to dip the paintbrush in the water cup to wet it, then swirl it in their chosen color until the paint activates. Encourage patience with a fun mantra like “swirl, swirl, swirl” to ensure they mix thoroughly—my own children were often too eager at first and ended up with watery, ineffective colors. Once loaded, have them apply the paint to the paper with broad, flowing strokes.
When they’re ready to switch colors, teach them how to clean the brush: Rinse it in the water cup and blot it on a paper towel to remove excess. Then, repeat the wetting and swirling process with the new hue. Offer guidance and corrections as needed, but embrace imperfections—preschoolers learn immensely from their own errors. If a hole appears, calmly explain what caused it (too much water or pressure) and how to avoid it next time. And don’t forget to paint alongside them; your participation turns this into a bonding moment.
Once they’ve finished their practice piece they might request another sheet. If they seem comfortable and confident, hand over the jellyfish printable and let their creativity shine. Encourage bold color choices and blending for a dreamy, underwater effect. After painting, set the artwork aside to dry completely overnight, ensuring it’s flat to prevent curling.
Tips for Teaching Watercolor to Preschoolers
Here is how to get gorgeous results instead of brown puddles with holes.
- Use real watercolor paper or thick cardstock Cheap printer paper buckles and tears instantly. 90-lb or 140-lb cold-press watercolor paper is worth every penny.
- Liquid watercolors > cheap dry pans Liquid watercolors (Sax, Sargent, or Colorations brands) give vibrant color with almost no scrubbing → fewer holes. If using pans, pre-wet them 10 minutes before starting.
- Two-cup system Cup 1: clean water for wetting brush Cup 2: dirty rinse water Prevents the dreaded muddy palette.
- Teach the magic phrase “Wet → Swirl → Paint → Wipe” Turn it into a song. Do it together 10 times before they touch the good paper.
- One color at a time (at first) Let them master loading and painting with one color before offering the whole tray. Reduces overwhelm and brown disasters.
- Big brushes, big strokes Small brushes encourage scrubbing holes. Give them a size 10–14 round brush so they naturally make sweeping strokes.
- Tape the paper down Painter’s tape on all four sides keeps the paper flat and immovable.
- Model side-by-side Paint your own jellyfish next to them. Narrate: “I’m swirling blue… now purple… look how they mix on the paper!” They copy you instantly.
- Embrace the bleed Tell them jellyfish love blurry edges. The more colors touch while wet, the more magical it looks. No “stay inside the lines” pressure here.
- Dry flat overnight Clothesline with clothespins or flat on cookie sheets. Curling will make the scissor skills practice more difficult.

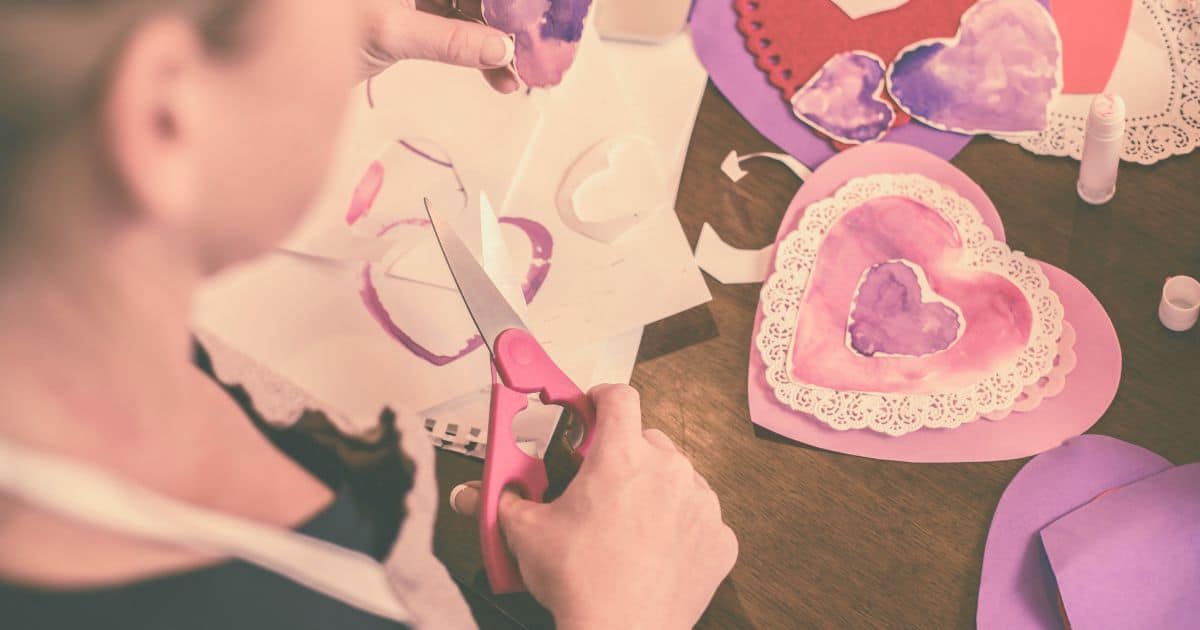
Preschool Scissor Practice: Building Skills Step by Step
With the watercolor jellyfish dried and ready, it’s time for the scissor portion. Before handing over the printable or the scissors, start with a simple warm-up to familiarize them with the motions without any tools involved. Have your child hold their hand out in front of them as if grasping a pair of scissors: thumb on top, fingers curled underneath, and palm facing inward. Demonstrate opening and closing your hand slowly, and encourage them to mimic you. In my experience, the opening motion is often the trickiest for young children, so emphasize that part with playful repetitions.
Once they’ve practiced this empty-handed exercise, introduce scrap paper and child-safe scissors. I prefer blunt-tipped, metal-bladed options like Fiskars preschool scissors, as they cut cleanly without the frustration of dull plastic blades. Point out the different hole sizes (thumb in the smaller one, fingers in the larger) and help them position the scissors correctly in their hand—unless they insist on doing it themselves, in which case, let them try while gently insisting on proper form.
To ease them in, you can hold the paper steady at first, allowing them to focus solely on the cutting motion. Keep this phase brief until they’ve mastered opening and closing smoothly. Then, transition to having them hold the paper with their non-dominant hand, practicing the coordination needed for successful cuts. By introducing elements gradually, you set your child up for success and minimize potential frustration.
When they consistently make clean cuts on scraps, present the jellyfish printable and guide them to follow the marked lines for the tentacles. The straight-line version is perfect for novices, offering long, straightforward paths that build confidence. For children who’ve used scissors before, the wavy-line printable adds an exciting challenge, requiring subtle turns and adjustments.

Grab the Free Jellyfish Scissor Skills Practice Printable Below
Tips for Teaching Scissor Skills to Preschoolers
.Proven tricks that turn “I can’t” into confident cutting.
- Start with the correct grip every single time
- Thumb in the small hole, middle + ring fingers in the big hole, index finger resting on the outside for control.
- Say: “Thumbs up to the sky!” or “Give your scissors a high-five!”
- If the grip is wrong, stop and fix it immediately—bad habits form quickly.
- Separate the two jobs
- Helper hand holds and turns the paper.
- Scissor hand only opens and closes.
- Hold the paper for them the first 3–5 minutes so they feel success right away.
- Teach “open wide” first Most children close the blades fine but forget to open them fully. Practice in the air: “Open like a hungry alligator… chomp!” Do 20 repetitions before paper ever appears.
- Use the “turn the paper, not your body” rule Keep elbows tucked in. Turn the paper with the helper hand when you need to change direction.
- Choose the right resistance
- Too easy: printer paper (curls and tears)
- Just right: cardstock strips, old greeting cards, straws, playdough
- Harder: thin cardboard or laminated strips
- Progression ladder (use in order)
- Snipping playdough or straws
- Fringe cutting (lines that stop)
- Cutting across 1-inch strips
- Long straight lines (tentacles)
- Gentle curves/waves
- Tight curves and spirals
- Celebrate tiny wins Every single successful snip gets a cheer. Keep sessions short (5–12 minutes) so you always end on a high note.
- Thumb trick for lefties Look for scissors marked “left-handed” (blades are reversed. If you only have right-handed scissors, let lefties cut upside-down (thumb in bottom hole) until you get proper lefty scissors. This is essential for my youngest son, who is a leftie!
- Fix common mistakes gently
- “Scissors ran away!” → “Let’s bring them back to the line.”
- Veered off → “That’s okay—jellyfish grow new tentacles!”
- Cutting too fast → “Slow like a sleepy turtle wins the race.”
- End with a “parking spot” Have a special cup or tray labeled “Scissor Home.” Scissors always get walked (points down) and parked there. Builds responsibility and safety.

More Scissor Skills Activities for Mastery
To extend the learning and provide even more practice, incorporate these additional scissor-based activities into your routine. Each one targets different aspects of fine-motor control while keeping the fun factor high.
First, try playdough snipping. Roll out long “snakes” of playdough and let your child snip them into small segments. The soft resistance of the dough strengthens hand muscles without the pressure of precision cutting, making it an excellent warm-up or standalone exercise.
Next, explore straw cutting. Provide a assortment of colorful plastic straws and have them cut them into bead-sized pieces. These can then be strung onto yarn or pipe cleaners to create necklaces or bracelets, adding a crafting element that reinforces the purpose of their cuts.
For a creative twist, set up a magazine strip collage. Give your child old magazines or catalogs and instruct them to cut out pictures or strips, which they can then glue onto a larger sheet to form a scene—perhaps an underwater world to complement their jellyfish. This activity introduces cutting irregular shapes and encourages decision-making.
Another engaging option is drawing various lines on colored paper strips—straight, zigzag, wavy, or even castle-like peaks—and having them cut along the paths. Once cut, these strips can be glued as extended tentacles onto a blue background paper, creating a full ocean diorama.
Take the practice outdoors with nature scissors. Give your child safety scissors and encourage them to cut the lawn. My youngest, 4 year’s old, loves trimming our lawn with his scissors.
Finally, experiment with tape cutting. Apply strips of painter’s tape or masking tape to a table or large paper, and have your child cut along or through them. The tape provides a straight guide and prevents paper from curling, offering immediate success and satisfaction.
These extensions not only vary the materials and challenges but also help reinforce scissor safety rules in different contexts, ensuring the skills become second nature. For more ideas check out these 5 activities from NAPA.

Why This Simple Jellyfish Matters More Than You Think
In just two quiet afternoons—one filled with swirling color, the next with careful snips—your preschooler will have done far more than make a pretty craft. They will have felt the deep satisfaction of creating something luminous with their own hands, then bravely refining it with a tool that they may have tinkered with in the past but didn’t feel confident with. That combination of beauty and mastery is powerful: it teaches them that effort is worth it, mistakes are fixable, and “I can’t… yet” can become “Look what I did!” in less than twenty-four hours
I still have my now-eight-year-old’s first watercolor jellyfish; every time I see its wild streaks of turquoise and neon pink I remember the exact moment he held up his freshly-cut tentacles with joy in his eyes. Those moments are the ones we keep forever.
So print the jellyfish and let the paint dry overnight. Tomorrow your child will pick up scissors not because they have to, but because they simply cannot wait to make their jellyfish look real. And when they do—when those wiggly tentacles finally drift and float around like real ocean magic—you’ll understand why this activity is a favorite to share. It isn’t about perfect lines or staying inside the black outlines. It’s about watching a child discover they are capable, creative, and completely unstoppable. Happy painting, happy cutting, and happy playing for hours.
Jellyfish Scissor Skills
AT A GLANCE ACTIVITY INSTRUCTIONS
Materials
- Included printable
- Watercolor paints
- Child’s safety-scissors
Instructions
- I have included a jellyfish with straight lines and one with curving lines based on your child’s level.
- You can allow your child to color the jellyfish with markers or crayons first or jump right into practicing using scissors. I enjoy having my children water color the jellyfish before cutting the tentacles.
- Explain that they’ll be making the tentacles for their jellyfish and show the lines they’ll cut on.
- Show them how to hold the scissors. You may need to help hold the paper but let them do as much on their own as possible.
Recent Posts on the Blog