SEWING FOR LITTLE ONES
Easy hand sewing crafts for kids.
— By Julie Hodos on October 28, 2024; Updated December 8, 2025.

This post may contain affiliate links. Please refer to our disclosure policy.
Does your child love crafting? Maybe they watch you sew and have shown interest? This activity is perfect for introducing your preschooler to the world of sewing, building fine motor skills, and practicing spatial reasoning. Expectations are low but the sense of accomplishment after is great!
Table of Contents

I love seeing the joy of watching my little one’s face light up when they create something with their own hands. So today, we’re diving into easy hand sewing crafts that are tailor-made (pun intended!) for young kids. Sewing might sound intimidating for little ones, but trust me, with the right approach, it becomes a delightful, low-pressure adventure.
We’ll start with the basics, explore why it’s such a fantastic activity, and then expand into a whole bunch of additional ideas to keep the fun going. Whether you’re homeschooling, looking for rainy day activities, or just wanting to bond over sewing crafts and maybe a hobby you love, these easy hand sewing crafts will have your kids stitching up smiles in no time.
Why Sew with Your Child?
Sewing is a wonderful skill to have because it can help you save money. Whether you mend your own clothes or create your own items such as blankets, curtains, pillows, and so on. Teaching a preschooler the basics of sewing is an excellent way to build hand strength, practice fine motor skills, practice spatial reasoning, and plant the seed for a future interest or hobby.
Let’s break this down a bit more. In a world full of screens and instant gratification, sewing offers a hands-on way to slow down and focus. For preschoolers, those wiggly fingers are still developing, and easy hand sewing crafts provide the perfect workout. Fine motor skills -like pinching, grasping, and pulling -get a major boost, which helps with everything from writing to buttoning shirts. Spatial reasoning? That’s the magic of visualizing how things fit together, like puzzle pieces in 3D. Plus, it’s thrifty! Imagine your child growing up knowing how to fix a ripped toy instead of tossing it -talk about life skills.
But the real win? The confidence boost. When a 3-year-old threads a needle (with a little help) and sees their colorful creation, it’s like they’ve conquered a mountain. It’s not about perfection; it’s about the process. And as a parent, you’ll love how it encourages patience, creativity, and even math concepts like patterns and measurements. Sewing isn’t just a craft -it’s a gateway to independence and problem-solving. If your kiddo has shown curiosity by peeking over your shoulder during your own projects, now’s the time to invite them in.
Read Next: Indoor Activities for Kids

Making Sewing Accessible for Kids
How do we make sewing accessible for a young child though? With their little hands and unrefined hand-eye coordination they are bound to stick themselves with the sharp and pointy needle. And what could actually be expected of them? I offer the solutions to these questions in the form of materials needed and the end goal.
Safety first -that’s the golden rule for easy hand sewing crafts with kids. Traditional needles are a no-go for ages under 6; they’re too sharp and can lead to tears (the sad kind, not the fabric kind). Instead, we swap them for kid-friendly alternatives that minimize risks while maximizing fun. The key is simplifying everything: no complex patterns, no deadlines, just pure exploration.
Think of it like this: Kids are explorers, not experts. Their coordination is still budding, so we use oversized tools and forgiving materials. This way, they can poke, pull, and play without frustration. And expectations? Keep them realistic. A wobbly line of stitches is a masterpiece in their world. By starting small, you’re setting them up for success, turning potential “I can’ts” into “Look what I did!” moments.

Books to Spark Sewing Excitement Before You Stitch
Nothing gets a child’s imagination buzzing like a great story -especially one that ends with a cozy blanket or a magical ball of yarn. Reading aloud before you pull out the plastic needles does three things: it plants the idea that they can make something real, it shows that mistakes are part of the process, and it makes the sewing craft feel like an adventure instead of a chore. Below are eight picture books (tried-and-true favorites at our house) that tie straight into easy hand sewing crafts.
- Extra Yarn by Mac Barnett, illustrated by Jon Klassen: A girl named Annabelle finds a box filled with yarn of every color -and no matter how much she knits, the yarn never runs out. She turns her gray town into a rainbow.
- The Patchwork Quilt by Valerie Flournoy, illustrated by Jerry Pinkney: Tanya watches her grandmother cut and stitch old clothes into a quilt that holds family memories. When Grandma gets sick, Tanya finishes it herself.
- The Quiltmaker’s Gift by Jeff Brumbeau, illustrated by Gail de Marcken: A generous quiltmaker only gives quilts to the poor; a greedy king learns that giving feels better than gold.
- The Keeping Quilt by Patricia Polacco: A quilt made from Aunt Rachel’s babushka and Uncle Vladimir’s shirt is passed down for generations -baptisms, weddings, birthdays.
- The Quilt Story by Tony Johnston, illustrated by Tomie dePaola: A mother stitches a star-patterned quilt for her daughter Abigail long ago; it comforts her through moves and adventures, then is tucked away in the attic until a new little girl discovers it years later and finds the same warmth and security in a new home.
- The Tailor of Gloucester by Beatrix Potter: A poor tailor is too sick to finish the mayor’s fancy waistcoat in time for his Christmas wedding, but at night the little mice he once saved from his cat Simpkin, sneak in and stitch the most beautiful coat with tiny, perfect stitches.
Pro reading tip: Sit on the floor with the embroidery hoop and yarn nearby. When the story ends, say, “Ready to make our own magic yarn picture?” The book-to-craft handoff feels natural, and the characters become cheerleaders for wobbly stitches and bold colors.
Read Next: The History of Quilting for Kids
A Perfect Sewing Craft for Young Kids
This beginner project is the cornerstone of our easy hand sewing crafts lineup. It’s essentially free-form embroidery, where creativity rules and rules are few.
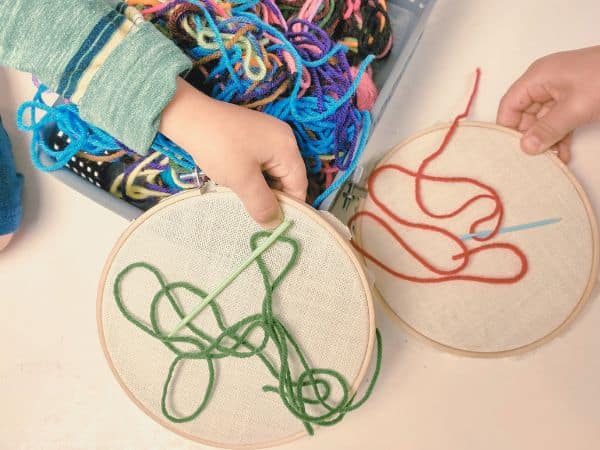
Materials Needed
The majority of the supplies can be found at secondhand shops in their miscellaneous section. Sometimes they’re all bundled together in a Ziploc bag. The kid friendly needles can be found at craft stores or I have included a link below of the ones we purchased online. The basic materials needed for making this kid friendly are as follows:
- Plastic needles (large eye, blunt tip—perfect for little hands; check out this link for the ones we love)
- Embroidery hoop (6-8 inches works best; it keeps fabric taut without slipping)
- Yarn (chunky, colorful varieties; wool or acrylic for easy gripping)
- Basic linen or cotton fabric (scraps are fine; aim for light colors to show off the yarn)
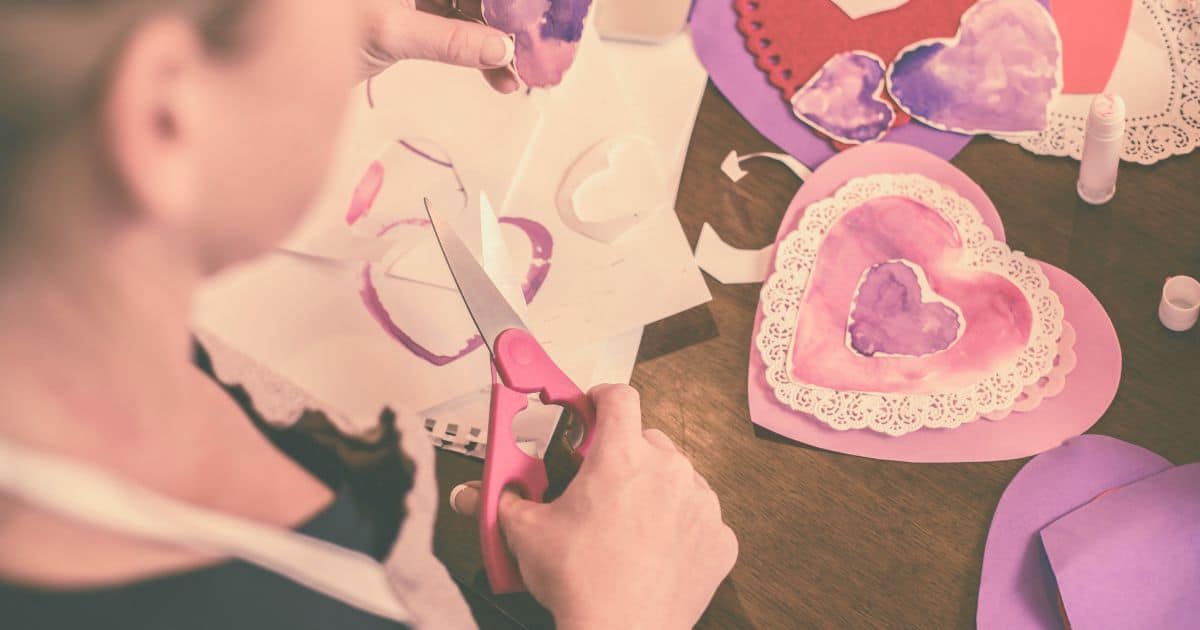
Don’t forget scissors for trimming -kid-safe ones aren’t usually effective for fabric/yarn so use your own and assist as needed -and maybe some markers for pre-drawing simple shapes if your child wants guidance. Raid your recycling bin for fabric scraps or hit up thrift stores for hoops and yarn bundles.

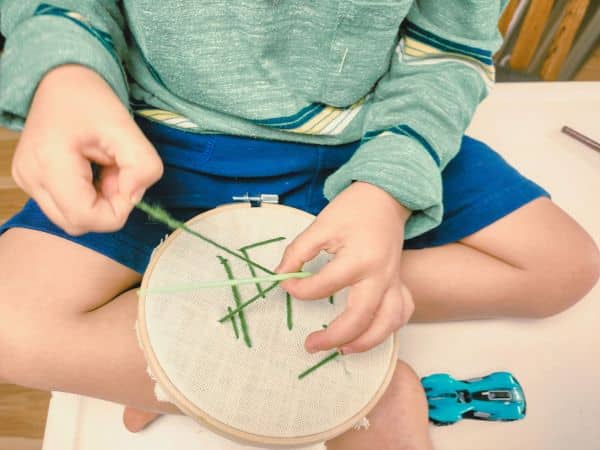
Assembly for Your Child
Before beginning you will want to place the fabric in the embroidery hoop. Once you have tightened the metal piece and the two circles are snug together, trim the extra fabric on the outside. Fabric scissors are preferred if you have them but not necessary.
Cut the yarn so that it is about the length of shoulder to fingertip. Be sure to ask your child which color yarn they would like to use first if you have options. Now, thread the needle then secure it in place on the fabric by going up from the bottom, back down less than an inch away and tie a simple, secure square knot. Once that is complete your child is ready to take over.
Prep time is your secret weapon here. Stretch the fabric tight in the hoop to prevent bunching—it’s like framing a canvas for their artwork. Choose yarn lengths that aren’t too long to avoid tangles; arm’s length is ideal for young kiddos. Involving them in color choices builds excitement and ownership. Threading the needle yourself at first models the skill, but encourage them to try when the yarn inevitably slips out. My older 4 year old always wants to be independent and he was able to rethread his yarn easily after a few minutes.

Setting Realistic Expectations and Offering Assistance
Show them how to hold the hoop in their left hand and needle in their right. The thread should be starting from the bottom so they will need to push up through the fabric to begin. Once they have pulled it through, but not too tight, direct them to push it back down through the fabric.
This is where we’ve taken the concept of embroidery or any type of needlework and made it simpler for kids. We have tossed out the pattern! Wherever their needle lands is the best choice for where the yarn should go. My 4 year old, made his sewing project very random – as to be expected. My 5 year old on the other hand used red yarn and was more methodical, he created a specific design from his head.
Occasionally they would lose their thread off the needle. Mick needed assistance rethreading the needle but Marty required no help and rethreaded it on his own. By the third time, Mick was doing it himself. It was still faster for me to do it though so he would pass it off to me once in a while; but as I said before he prefers to be independent.
Patience is key -demonstrate slowly, then let them mimic. If they’re left-handed, swap the hands! No patterns mean no “wrong” way, which reduces pressure. Celebrate every stitch, even if it’s a zigzag mess. Assistance-wise, hover but don’t hover—offer help when asked, like rethreading. My kids’ projects showed their age’s skill level while the color showcased their favorite color. It’s all about progress and memories, not perfection.
Teaching Spatial Reasoning Through Sewing
Spatial reasoning is the skill of working with 2-D and 3-D shapes. This sewing activity is perfect for practicing this skill and here is why. A child will forget to go up and down through the fabric. Instead they will constantly want to push the needle down and wrap the yarn around the outside and around the hoop, unconsciously of course.
Mick did this a couple times. He would push the needle down and then come up around the outside of the hoop and push it back down through the top. Watch your child and see if they notice their mistake. They may pause and realize something does not look right but they can’t tell what is wrong. Or they may right away ask you to fix it. Another option is that they do not recognize it all together.
No matter what happens, we can step in and easily rewind the events that led to the mistake. Be sure to show them how it went wrong. Have them carefully demonstrate for you the motions of going down through the fabric, up, and back down. Do this a few times before stepping back and giving them independence with it.
This is where the magic happens. Sewing forces kids to think about “in” and “out,” “over” and “under” -core spatial concepts. When they wrap yarn around the hoop by accident, it’s a teachable moment. Gently unravel and explain: “See how the yarn needs to go through the fabric like a worm in the dirt?” Repeat the motion together. Over time, they’ll internalize it, boosting their ability to manipulate shapes mentally. It’s sneaky learning at its best!
Read Next: Discovering 2D and 3D Shapes with Grapes and Toothpicks

The Finished Sewing Project
To finish the project and secure the yarn in place, repeat the same knot you did at the beginning. Do all this on the backside. I like to leave the fabric in the hoop and hang it on our art wall.
Finishing strong builds closure. Tie off on the back to keep it neat, then admire! Frame it in the hoop for instant wall art, or snap a photo for their “portfolio.”
Read Next: The Best Kids’ Art Storage Solutions
Gauging the Right Age to Begin Easy Hand Sewing Crafts
Not every child is ready at the same age, and that’s okay! Preschoolers (3-5) are often eager, but look for signs like interest in threading beads or drawing lines. If they can hold crayons steadily and follow simple instructions, they’re probably good to go. Start with the basics: Can they pinch small objects? Do they enjoy sensory play with textures?
For 4-5, they can handle plastic needles easily with supervision. Older kids (6+) might graduate to real needles and patterns, but always match to their patience level. Watch for frustration -if they’re getting upset, pause and try again later. Every child develops differently; the goal is fun, not forcing it. Test with a quick trial: Hand them yarn and see if they engage.

Troubleshooting Common Issues in Easy Hand Sewing Crafts
Even the simplest sewing crafts can hit snags, but don’t worry -we’ve got fixes! Here’s a practical guide to common hiccups:
- Needle Won’t Go Through Fabric: Fabric too thick? Switch to looser weave like burlap. Or pre-poke holes with a toothpick for extra ease.
- Yarn Tangling or Knotting: Shorten yarn lengths and teach gentle pulling. If it knots, calmly untangle together.
- Child Loses Interest or Gets Frustrated: Break into short sessions (10-15 minutes). Praise efforts lavishly and if frustration overflows then take a break until later or revisit the sewing craft tomorrow.
- Accidental Pricks/pokes (Even with Plastic Needles): Rare, but if it happens, have band-aids ready. Remind them to go slow and keep fingers clear.
- Uneven Tension: Yarn too loose or tight? Demonstrate “just right” pulls. It’s okay if it’s bumpy -embrace the handmade charm!
- Thread Slipping out of Needle: You can try wetting the yarn end slightly for better grip, but sometimes it is teaching your child to be aware of what’s happening at the eye of the needle and pinching the yarn and the eye at the same time when they pull.
8 Easy Hand Sewing Crafts for Kids
Ready to expand beyond the basics? These 8 easy hand sewing crafts build on our starter project, using similar safe materials. They’re straightforward, requiring minimal prep, and perfect for kids 3-8 (with more supervision for younger ones). Each takes 20-60 minutes, fosters creativity, and reinforces skills like fine motor control. Gather basics: plastic needles, yarn/thread, fabric scraps, felt, buttons, and scissors. Let’s stitch!
Lacing Cards: Punch holes in shapes made out of cardstock (hearts, animals) with a hole punch. Kids “sew” yarn through the holes. Materials: Cardstock, yarn, hole punch. Steps: Draw shape, punch holes 1 inch apart, lace in/out. Tip: It’s a great intro since no real needle needed.
Felt Bookmarks: Cut felt rectangles, sew on simple shapes or initials. Materials: Felt, embroidery floss. Steps: Cut 2×6 inch strip, stitch edges or add decor. Tip: Blunt needles prevent pokes; personalize with their name.
Simple Felt Puppets: Cut felt animal shapes, sew edges leaving bottom open for hand. Materials: Felt, googly eyes (optional). Steps: Cut two matching shapes, stitch around edges. Tip: Add yarn hair for extra fun.
Burlap Weaving Mats: Weave yarn through burlap’s loose weave. Materials: Burlap squares, yarn. Steps: Pull yarn over/under threads in rows. Tip: Like a mini loom; teaches patterns without needles.
Pom-Pom Garlands: Sew store-bought or homemade pom-poms together. Materials: Pom-poms, thick thread. Steps: Thread needle through centers, knot between. Tip: Hang your garland as room decor, it’s festive and easy.
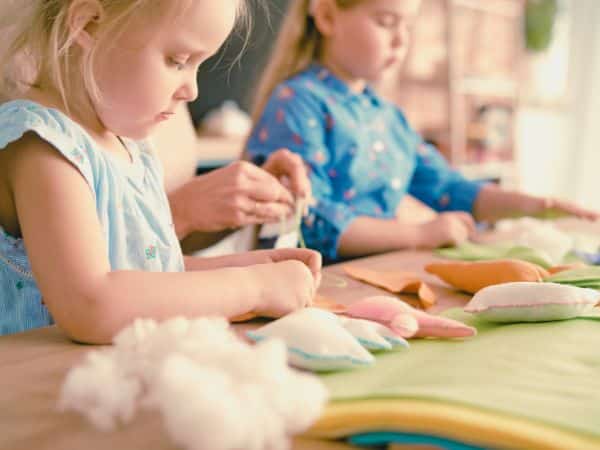
Stuffed Felt Shapes: Similar to puppets, cut two identical shapes (stars, circles), sew edges, stuff with cotton, sew last edge. Materials: Felt, stuffing. Steps: Stitch most edges, stuff, close. Tip: Make mini pillows for toys.
Ribbon-Edged Placemats: Sew ribbon around fabric edges. Materials: Fabric rectangles, ribbon. Steps: Pin ribbon, stitch along. Tip: This can help build straight-line skills.
Beaded Bracelets (Sewn Style): Use pony beads to tread onto yarn or elastic to create fun craft jewelry. Materials: Felt, beads, Velcro. Steps: Tie one bead, thread rest of beads, tie together elastic ends. This is still a great way to practice using a plastic needle or threading beads by hand.
These sewing crafts scale up: Younger kids do random stitches, older ones add details from their own imagination. Rotate them weekly for variety -your child will build skills without boredom. Discover specific, Free Sewing Projects for Kids at The Art of Home. Many of these are beyond the basics but are a great next step!
Read Next: Make a Fleece Tie Blanket with Your Child
Sewing Ideas for Kids
Sewing is an excellent way for kids to practice spatial reasoning and more life skills. By using a plastic needle, an embroidery hoop, and modifying expectations we make this skill accessible for young children.
Once your child masters these easy hand sewing crafts, branch out! Try themed weeks: Ocean creatures with blue yarn or holiday ornaments. Hobby stores sell kits specifically designed for kids too. Incorporate stories -read The Tailor of Gloucester then sew mini clothes. Or go green: Use recycled fabrics for quilts. The possibilities are endless, keeping sewing fresh and exciting. Leave a comment sharing what projects you and your kiddo have tackled together. I love to hear your stories!
Simple Sewing Craft
AT A GLANCE ACTIVITY INSTRUCTIONS
Materials
- Embroidery hoop
- Linen fabric or extra fabric from around the house
- Plastic needle
- Yarn
- *Simple cross stitch kit
Instructions
- If you’re working with a younger child then using the embroidery hoop, place your fabric in it. Secure the hoop and help your child thread the needle with yarn cut to about the length from your fingers to your elbow.
- Tie a knot at the end of the yarn.
- Show them how to hold their embroidery hoop in their weak hand and their dominant hand works with the needle. Pushing it from the bottom, pulling through, and then pushing it back down to pull through. Repeat.
- For young ones only guide them in making sure their yarn doesn’t wrap around the hoop and that it goes up and down, up and down. Now is not the time to require a design.
- For an older child (5+) set them up with a cross stitch kit. You may want to watch a how-to cross-stitch video before instructing them.
Recent Posts on the Blog