Skip to content

This post may contain affiliate links. Please refer to our disclosure policy.
Are you looking for a fun, easy, and educational musical craft to do with your kids? This homemade drum craft is the perfect activity to spark creativity, practice fine motor skills, and inspire a love for music in your little ones. It’s budget-friendly, uses everyday household items, and offers hours of entertainment long after the craft is complete. Plus, it ties into poetry and music in a way that makes learning feel like play. Whether you’re a parent, caregiver, or educator, this project is a fantastic way to engage children while sneaking in some developmental benefits.
Table of Contents

I adore making this drum craft with my boys—it’s quick, simple, and endlessly entertaining. Not only does it result in a functional instrument, but it also opens the door to reciting poetry and exploring rhythm together. If you’re curious about more ways to weave poetry into your child’s life, check out my post, How to Weave Poetry Seamlessly into Your Child’s Life.
This guide will walk you through creating the drum, using it purposefully with Robert Louis Stevenson’s poem Marching Song, exploring drum-themed books, and introducing additional music activities to deepen the musical experience. With detailed steps, safety tips, and extension ideas, I think you’ll feel confident to have a joyful crafting experience.
Why This Drum Craft is a Winner
Before we dive into the how-to, let’s explore why this drum craft is such a hit for kids aged 3–8. It’s not just about creating a cool toy—it’s about the process and the learning opportunities it unlocks:
- Fine Motor Skills: Tasks like cutting paper and threading strings help kids refine their pincer grip and hand-eye coordination, essential for writing and other precise movements.
- Musical Exploration: Playing the drum introduces rhythm, tempo, and sound dynamics, laying a foundation for music appreciation. Rhythm also ties into early math skills, as it involves patterns and counting.
- Creativity and Self-Expression: Decorating the drum lets kids express their unique style, boosting confidence and imagination.
- Eco-Friendly Learning: By upcycling household items like cans, you’re teaching kids about sustainability in a hands-on way.
- Literary Connection: Pairing the craft with poetry recitation builds language skills, memory, and a love for words, making it a multi-disciplinary activity.
This craft is versatile enough to adapt to different ages. Toddlers can focus on simple tasks like sticking on decorations, while older kids can handle measuring, cutting, or even designing more complex patterns. Safety is a priority, and we’ll cover tips to make the project kid-friendly, especially for containers with sharp edges. Plus, the low cost and use of recycled materials make it accessible for any family or classroom.

Exploring the History of Drums
Drums have been a heartbeat of human culture for thousands of years, resonating through ancient rituals, modern music, and everything in between. Sharing the rich history with kids can deepen their appreciation for the homemade drum they’ve crafted, connecting their creation to a global tradition that spans continents and centuries.
Drums are among the oldest known musical instruments, with evidence dating back to around 3000 BCE in ancient Mesopotamia and Egypt. Archaeological finds, like clay drums and animal-skin-covered frames, show they were used in religious ceremonies, community gatherings, and even as tools for communication. In ancient Egypt, drums accompanied sacred rituals, often played by priests to honor deities. Their deep, resonant sounds were believed to connect the physical and spiritual worlds, making them powerful symbols in early societies.
In Africa, drums have held a central role for centuries, far beyond mere music. The talking drums of West Africa, such as the djembe and tama, were crafted from hollowed logs and animal hides, tuned to mimic human speech patterns. Skilled drummers could send messages across vast distances, relaying news, warnings, or invitations to gatherings. These drums were also integral to storytelling, dances, and celebrations, binding communities together. The djembe, with its goblet shape, remains a vibrant symbol of African musical heritage, often played in groups to create complex, layered rhythms.
Across the Atlantic, Native American cultures developed their own drumming traditions. Drums, often made from wood and stretched hides, were central to ceremonies, storytelling, and dances. The powwow drum, for example, is large and played by multiple drummers sitting in a circle, creating a unified beat that represents the heartbeat of the community. These drums were often decorated with symbols reflecting tribal stories or spiritual beliefs, much like the decorative touches kids add to their homemade drums.

In Asia, drums have played diverse roles. In Japan, taiko drums—massive instruments made from wood and cowhide—date back to at least the 6th century. They were used in Shinto rituals, to signal battles, or to mark festivals. Today, taiko drumming is a dynamic performance art, with groups like Kodo showcasing powerful, choreographed rhythms. In India, the tabla, a pair of small hand-played drums, emerged as a sophisticated instrument in classical music, capable of producing a wide range of tones and rhythms that accompany vocalists and dancers.
In medieval Europe, drums found their place in military traditions. Snare drums, with their distinctive rattling sound, were used to keep soldiers in step during marches or to signal commands on the battlefield. This military connection is echoed in Robert Louis Stevenson’s Marching Song, where the drum sets the pace for a playful parade. Over time, these drums evolved into the modern drum kits used in jazz, rock, and pop, with innovations like the bass drum pedal in the early 20th century revolutionizing music.
Today, drums are everywhere—from school marching bands to global music festivals. They come in countless forms, from steel drums in the Caribbean, which transform oil barrels into melodic instruments, to electronic drum pads in modern studios. Their universal appeal lies in their simplicity: a surface to strike, a sound to share. By making their own drum, kids join this ancient tradition, tapping into a rhythm that has echoed through human history.
This history can spark curiosity in young minds. For example, you might tell kids that their homemade drum, with its recycled can, is like the steel drums of Trinidad, made from repurposed materials. Or compare their marching to the soldiers of old, whose snare drums kept armies moving. By connecting their craft to these stories, kids see their drum as more than a toy—it’s a piece of a global musical tapestry, inviting them to explore culture, history, and creativity.

Drum-Themed Books
Pair the craft with drum-themed books to spark discussions about rhythm, culture, and creativity. Here are five favorites for ages 3–8:
- Pokko and the Drum by Matthew Forsythe: A young frog loves her drum, despite her parents’ pleas for quiet. This story celebrates self-expression, with whimsical illustrations. Play a forest parade after reading.
- Drum Dream Girl by Margarita Engle, illustrated by Rafael López: Based on Millo Castro Zaldarriaga, a girl in 1930s Cuba who broke gender barriers to drum. Its poetic text and vibrant art inspire talks about perseverance.
- Hand, Hand, Fingers, Thumb by Al Perkins, illustrated by Eric Gurney: A Dr. Seuss classic with monkeys drumming. Its catchy rhymes are perfect for tapping along, especially for younger kids.
- Max Found Two Sticks by Brian Pinkney: Max turns sticks into drums, showing kids how everyday objects can make music. Pair with a sound exploration activity.
Find these at libraries or bookstores. Read them before creating your drum craft to set the stage or afterward as a cozy wind-down.

Step-by-Step Guide to Making the Drum Craft
This activity requires minimal pre-planning and uses materials you likely already have. Here’s a detailed guide to creating your homemade drum craft, with tips to make it safe, fun, and educational.
Step 1: Prep the Container
The first step is to find a suitable container for your drum. Coffee cans, baby formula cans, large trail mix containers, or nut cans are ideal—anything with a flat lid and at least a quart in size. These containers produce a satisfying sound when tapped and are sturdy enough for enthusiastic drumming. Coffee cans give a deep, resonant tone, while smaller nut cans are perfect for tiny hands. If you don’t have an empty can, transfer the contents to another container (like a sealed jar for coffee) to free one up quickly.
To prepare the can:
- Remove the label if it’s not securely glued on.
- Wipe the inside and outside of the can clean with a damp cloth. Kids can help with this step, if there isn’t a sharp edge on the inside.
- Before your child is involved, use a paring knife or scissors to punch two small holes (about a quarter-inch in diameter) on opposite sides of the can, just below the rim. These will hold the strap later.
Safety Note: Do the hole-punching yourself, as some cans (like coffee or formula containers) have sharp inner rims. If you’re concerned about edges, choose containers that are similar to an oatmeal canister, which is safer and still works great.

Step 2: Gather Supplies
Here’s what you’ll need:
- A clean, empty can with a flat lid (quart-size or larger)
- Lightweight rope, shoestring, or sturdy yarn (2-3 feet long)
- Elmer’s glue
- Hot glue gun and glue sticks (adult supervision required)
- Construction paper (various colors)
- Optional: Tempera paint, markers, stickers, pom-poms, googly eyes, or other decorative items
Most of these are household staples, keeping the drum craft costs low. For paint, I recommend washable tempera paint for vibrant colors and easy cleanup. If you’re buying rope or yarn, choose something lightweight but durable to avoid weighing down the drum.
Read Next: 7 Types of Paint for Art in Homeschool
Step 3: Create the Drum
Now it’s time to build! Let your child pick a color of construction paper for the drum’s exterior—this small choice makes the project feel personal. Measure the paper to wrap around the can, and help your child cut it to size. Younger kids may need you to cut, but older ones can practice scissor skills with supervision.
Have your child squeeze Elmer’s glue onto the construction paper, then help them wrap the paper tightly around the can, pressing it down to secure it. A slight overlap is fine. Let the glue dry for about 10 minutes to ensure it’s set.

Step 4: Add the Strap
Once the paper is dry, align the construction paper with the pre-punched holes in the can. Carefully poke holes through the paper using a pencil or scissors tip (adults only). Let your child thread the rope or shoestring through the holes, going from outside to inside. Tie the ends together securely inside the can or tie large enough knots that they won’t slip through the holes. Adjust the strap length so the drum hangs comfortably below your child’s belly, like a marching band drum.
Safety Tip: If using a metal can, check for sharp inner rims. You can opt for a plastic container with a twist-off lid to avoid the issue entirely.
Step 5: Secure the Lid
If the can’s lid doesn’t twist on securely, use the hot glue gun to attach it permanently. This ensures the lid stays put during vigorous play and prevents exposure to any sharp inner rims. I’ve made drums with formula cans for my 3- and 5-year-olds without issues, but gluing the lid gives peace of mind when I can’t supervise closely.
Safety Note: Use a low-temperature hot glue gun and supervise closely. I keep the glue gun out of reach between uses and guide my boys to apply just enough glue depending on their age. For my littlest ones, I handle the glue gun and securing of the lid.

Step 6: Add the Finishing Touches
Let your child’s creativity shine! Provide tempera paint, markers, stickers, pom-poms, googly eyes, or fabric scraps for decoration. My boys love drawing pictures to make them more personal. Encourage them to go wild—there’s no wrong way to decorate. If using paint, lay down newspaper or a plastic tablecloth to minimize mess, and let decorations dry fully before playing.
Tip: For younger kids, stick to markers or stickers to avoid drying time. Older kids can usually be patient and wait for their drum to dry before using. I always prewarn my kiddo if they want to paint their drum that they won’t be able to use it right away.
Using the Drum Craft Purposefully
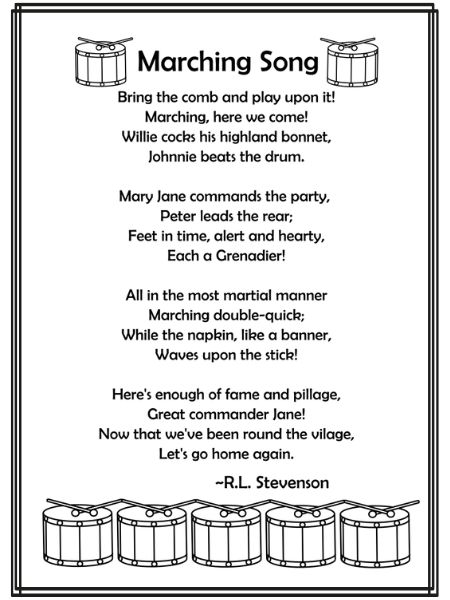
Your drum craft is ready—now let’s make it educational and fun! Pair it with Robert Louis Stevenson’s Marching Song from A Child’s Garden of Verses, a short, rhythmic poem perfect for kids. Additionally, try out other music activities like crafting a pan flute or shakers -check out inspiration below to create a complete marching song band!

Marching Song by Robert Louis Stevenson
Bring the comb and play upon it!
Marching, here we come!
Willie cocks his highland bonnet,
Johnnie beats the drum.
Mary Jane commands the party,
Peter leads the rear;
Feet in time, alert and hearty,
Each a grenadier!
All in the most martial manner
Marching double-quick;
While the napkin like a banner
Waves upon the stick!
Here’s enough of fame and pillage,
Great commander Jane!
Now that we’ve been round the village,
Let’s go home again.
Gather the family, form a line, and march around the living room, backyard, or neighborhood while reciting the poem. Let your child lead, banging their drum to the rhythm. With multiple kids, take turns letting each one be the “commander” or “drummer.” Personalize the poem by swapping in your kids’ names (for example “Marty commands the party, Mick leads the rear”). My boys love hearing their names, and it keeps the marching going longer as they request new versions.
Vary the tempo—slow and steady, then fast and energetic—and have kids match their drumbeats to the pace. This builds listening skills and coordination. Outdoor parades might even draw a curious neighbor or two, adding to the fun!

Inspiring a Love for Music
This drum craft is a gateway to musical exploration. Kids learn how sounds are made and how to control them, setting the stage for deeper music appreciation. Extend the learning with:
- Sound Exploration: Tap the drum lightly, then hard, using fingers, palms, chopsticks, or a spoon. Ask your child to describe the differences.
- Rhythm Practice: Teach simple patterns (for example, “tap-tap-rest”) and have kids repeat them. This introduces basic music theory.
- Song Integration: Sing nursery rhymes like “Twinkle, Twinkle, Little Star” while tapping along, connecting music and language.
More Music Activities for Kids
To keep the musical adventure going, here are additional hands-on music activities that complement the drum craft and further engage kids in the world of sound. These projects use everyday materials, encourage creativity, and reinforce musical concepts like pitch, rhythm, and tone. Perfect for ages 3–8, they can be done individually or as part of a family band!

Pan Flute Craft
Create a simple pan flute by taping together plastic straws of different lengths. Kids blow across the tops to produce varying pitches, mimicking a traditional pan flute. Introduces pitch and breath control, helping kids understand how air and length affect sound. Encourages fine motor skills through cutting and taping, and fosters experimentation with musical scales.
Shaker Jars
Fill small plastic containers (like spice jars) with rice, beans, or beads, then seal and decorate. Kids shake them to create different rhythms and sound textures. Develops rhythm and coordination through shaking patterns. Explores sound textures by comparing fillers, boosting sensory awareness and creative expression.

Water Xylophone
Fill glass cups or jars with different amounts of water, optionally adding food coloring for visual appeal. Kids tap the glasses with a spoon to create a range of pitches, forming a simple xylophone. Teaches pitch variation (more water = lower pitch) and sound dynamics. Enhances auditory discrimination as kids compare tones and encourages sequencing skills through pattern play.
Rhythm Sticks
Use wooden spoons or dowels as rhythm sticks, decorated with paint or tape. Kids tap them together or on surfaces to create rhythmic patterns. Builds coordination and rhythm skills through tapping sequences. Encourages listening and mimicry in call-and-response games, supporting memory and motor development.

Drum On!
This homemade drum craft, paired with the Marching Song poem, drum-themed books, and additional music activities, is a delightful blend of creativity, music, and learning. It’s a memory-maker that fosters a love for music and literature. My boys still rave about our drum parades, and I hope your family enjoys the same joy. Try it out and share your experience in the comments!
Homemade Drum Craft
AT A GLANCE ACTIVITY INSTRUCTIONS
Materials
- Container. Such as, an oatmeal or peanut container. Formula cans work great too!
- Lightweight rope or shoestring.
- Hot glue gun
- Construction paper
- *Tempera Paint or other art medium
Instructions
Material Prep
- Remove label if label is not completely glued down.
- Next, take the lid off of the can and punch two holes on opposite sides (just below the rim). A sharp paring knife may be needed.
- Cut rope for the drum to sit comfortably just below your child’s belly, leaving enough length to tie the ends together.
Kiddo Participation
- Let your child choose a color of construction paper to wrap on the side of the can. You may need to help to cut it to size. This does not need to be perfect!
- Have your child squeeze glue onto the cut construction paper and then assist them in pressing it onto the can’s barrel.
- Allow to dry. With impatient kiddos you may forge ahead being careful not to rip the damp construction paper.
- Using scissors lightly cut the construction paper through the existing holes.
- Have your child thread the rope or shoestring through with the ends going from the outside to the inside.
- Tie a knot at the ends or tie the string together (my preferred method).
- Lastly, Squeeze hot glue around the rim and press the lid back on top of the formula can. The age of your child will determine how much they help with this. And you’re finished!
*Optional: you can now let your child paint the drum.
*Caution: Some ideal shaped containers have sharp edges on the inside that little fingers could cut themselves on. Be sure to securely glue on the lid.
Recent Posts on the Homeschool Blog