This post may contain affiliate links. Please refer to our disclosure policy.
If your kids are anything like mine, they’re constantly pointing at the sky and asking big questions like “Why is it raining today?” or “Where do clouds come from?” Weather fascinates little ones because it’s always changing and directly affects their plans—whether it’s playtime outside or cozy time indoors.
That sense of wonder is exactly why I love bringing weather science into our home with simple, hands-on activities. Today I’m excited to share one of our absolute favorites: Raincloud in a Jar. This delightful experiment uses just shaving cream and food coloring to create a mini rainstorm right on your kitchen table. It’s quick to set up, incredibly visual, and turns an abstract concept into something kids can see, touch, and get excited about. Perfect for homeschool mornings, indoor rainy days, or any time you want to spark curiosity.
Table of Contents

Why Teach Kids About the Weather
Teaching kids about the weather goes way beyond making small talk on a cloudy day. It’s one of the most natural ways to nurture scientific thinking and sharp observation skills. When children learn how rain forms or why clouds look different each day, they start making connections between what they see outside and the bigger workings of nature.
It also helps them understand their everyday routines in a meaningful way. Knowing why we wear jackets in winter, grab umbrellas when the sky turns gray, or stay inside during thunderstorms builds practical knowledge and a sense of safety and preparedness.
In our family, weather lessons often turn into rich conversations that stretch far beyond the activity itself, it helps that Daddy is a meteorologist. Kids begin noticing patterns, asking deeper “why” and “what if” questions, and even developing empathy for how weather affects animals, plants, and people in different places. Best of all, it’s a gentle, screen-free way to encourage curiosity and critical thinking that feels like play rather than schoolwork.
Why Raincloud in a Jar Is Such an Engaging Activity
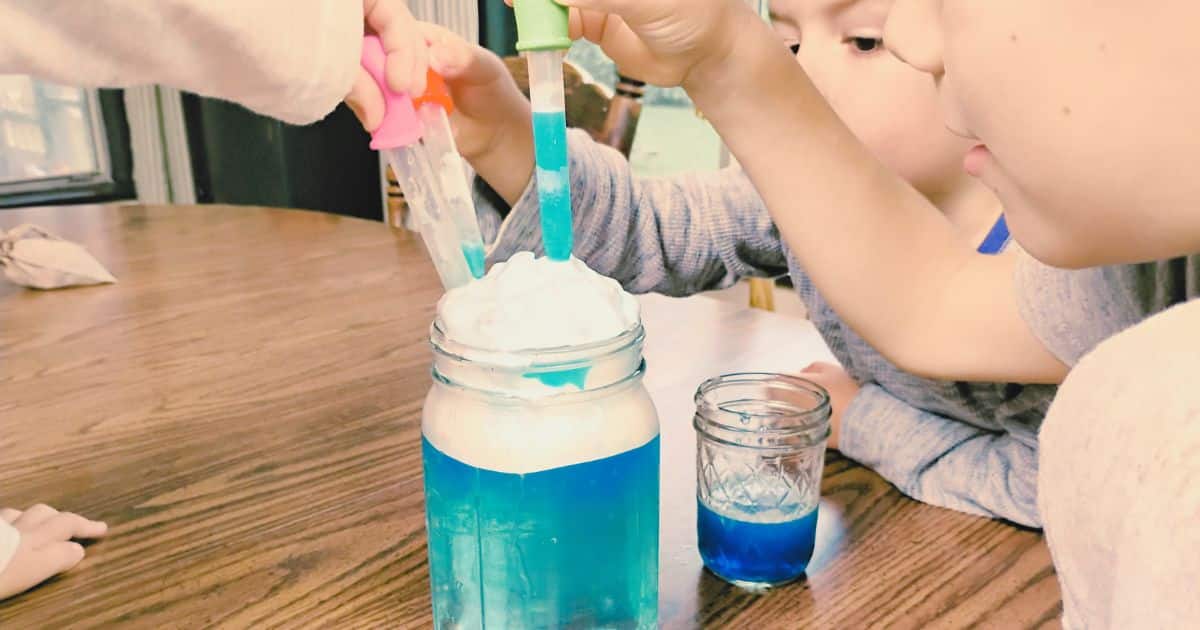
What makes the Raincloud in a Jar experiment so special is how perfectly it blends sensory fun, instant visual results, and real science learning. Unlike many experiments that require waiting hours or days to see what happens, this one delivers the “wow” moment within seconds. Kids get to pile on fluffy shaving cream clouds, drip vibrant food coloring, and watch as the clouds become full soo that colorful rain streaks dramatically fall through the foam into the water below—just like a real storm rolling in.
The hands-on, slightly messy nature of squishing foam and squeezing droppers keeps children fully engaged, especially for ages 3 and up. They love being in control of the “weather” happening right in front of them, which makes the learning feel exciting rather than like a lesson.
Every time we do this activity, I hear giggles mixed with genuine “aha!” moments as kids suddenly understand how clouds get heavy and release rain. It naturally leads to tons of follow-up questions and creative play, making it one of those rare activities that feels like pure fun while quietly teaching important concepts about the water cycle and weather.

Weather Books to Pair With This Activity
Pairing hands-on fun with read-alouds makes the learning stick even more. Here are some of our go-to children’s books about weather that complement the raincloud experiment beautifully:
- Little Cloud by Eric Carle: A little cloud drifts away from the group and imagines itself as everything from a sheep to an airplane before rejoining its friends to make rain. The simple, colorful illustrations make it ideal for toddlers and preschoolers learning about cloud shapes.
- The Cloud Book by Tomie dePaola: This classic introduces different cloud types—like puffy cumulus and wispy cirrus—with fun facts and playful drawings that help kids name what they see in the sky.
- Cloudy with a Chance of Meatballs by Judi Barrett: In this silly favorite, a town gets all its weather as food—spaghetti rain, meatball storms, and more—sparking wild imagination while gently showing how weather affects daily life.
- Water Is Water: A Book About the Water Cycle by Miranda Paul: Through poetic text and gorgeous illustrations, this book follows water changing forms from rain to ice to steam and back again, tying perfectly into how rain forms in clouds.
- It Looked Like Spilt Milk by Charles G. Shaw: White cloud shapes on blue pages look like animals, ice cream, and more, encouraging kids to do their own cloud-watching and creative storytelling outdoors or after the experiment.
- Cloudette by Tom Lichtenheld: A tiny cloud named Cloudette feels too small to make a big difference until she discovers she can still help others in her own special way. This sweet, encouraging story introduces kids to cloud types and the idea that even little clouds (and kids!) can create rain and bring joy.
- All the Water in the World by George Ella Lyon, illustrated by Katherine Tillotson: Through beautiful, flowing poetry and stunning illustrations, this book celebrates the water cycle—from rain and rivers to oceans and back again—showing how every drop is connected. It’s a lyrical way to help kids understand where rain comes from and why water is so precious, making it a perfect follow-up to watching rain fall in your jar.

How to Create the Raincloud in a Jar Experiment
To make your own Raincloud in a Jar, you’ll only need a few simple items most families already have at home. Grab a clear jar or tall glass — a wide-mouth mason jar works especially well because it lets everyone see the action clearly. You’ll also need water, foam shaving cream (not the gel kind), food coloring in blue or any fun colors, a dropper or pipette, and optionally a tray or shallow dish to catch any drips.
Start by filling the jar about three-quarters full with water. This creates the “sky” or air space beneath your cloud. Next, spray a generous, fluffy layer of shaving cream right on top of the water. mound it up a bit above the rim to form a thick cloud — the fluffier and thicker the layer, the better the rain effect will be. Don’t be shy with the shaving cream; it’s what makes the magic happen.
Mix the food coloring with a bit a water and then hand the dropper to your kids and let them gently squeeze drops of colored water onto the shaving cream cloud. Watch together as the color slowly seeps through the foam, just like water collecting inside a real cloud. Soon you’ll see colorful rain streaks begin to drip down into the water below, creating a beautiful mini storm right in the jar. The whole process takes under five minutes from start to finish, and the results are instant and exciting.

Tips for Success and Keeping the Mess Contained
- Choose the right shaving cream: Always use the foam kind rather than gel shaving cream. The foam creates a thick, fluffy cloud that holds the food coloring longer and gives you that realistic “rain” effect as the color slowly seeps through. Gel versions tend to clump and don’t perform nearly as well.
- Set up for easy cleanup: Place your jar on a large tray or baking sheet, and keep a hand towel nearby. This simple step contains any drips or overflow and makes cleanup a breeze.
- Prepare the food coloring: If your food coloring is very thick, mix a few drops with a teaspoon of water in small cups. This makes it easier for little hands to use the dropper and helps prevent overly dark stains. Washable food coloring is ideal if you’re doing this with younger kids.
- Supervise the dropper at first: For toddlers and preschoolers, load the dropper yourself in the beginning so they can focus on squeezing and watching the magic. Once they get the hang of it, let them take full control — they love being the “weather maker.”
- Cover and wipe quickly: If you’re concerned about stains on clothes or surfaces, have your child wear play clothes. Wipe up any spills or drips immediately with a damp cloth or paper towel. The sooner you clean, the less chance of any lingering color.
- Keep the cloud thick: Don’t skimp on the shaving cream! A nice tall, fluffy layer works best because it gives the color time to collect before raining down. If the rain slows down during the activity, simply add more drops or gently stir the top of the cloud — kids enjoy experimenting with this.
- Have supplies ready: Keep a hand towel nearby, along with extra shaving cream and food coloring. This keeps the momentum going without running to the kitchen mid-activity. Remember, the slight mess is part of the fun and washes away easily with soap and water.

5 More Fun Weather Activities
Here are five more easy weather experiments and activities to keep the learning going all week long. Each one uses simple supplies you likely already have at home.
Tornado in a Bottle: Fill a clear plastic bottle about two-thirds with water, add a few drops of food coloring and a teaspoon of glitter for sparkle, then screw on a second empty bottle upside down and tape the connection tightly with duct tape. Flip the bottles over and give them a quick swirl to create a spinning vortex that looks just like a tornado. Kids can experiment with swirling speed to see how the funnel changes shape. This one teaches about air pressure and rotating winds in a safe, reusable way that never gets old—perfect for repeat play!
DIY Rain Gauge: Cut the top off a clear plastic bottle, flip the top upside down inside the bottom to make a funnel, and mark inch measurements on the side with a permanent marker or tape. Set it outside in an open spot away from trees and buildings, then check it each morning to measure how much rain fell overnight. Record the numbers on a simple chart and compare to the local weather app. It’s a great way to introduce data collection and talk about precipitation patterns over a few days or weeks.
Water Cycle in a Bag: Draw a bright sun and some clouds on a gallon-sized zip-top bag with markers, then add about a half-cup of water and a few drops of blue food coloring. Seal it tightly, tape it to a sunny window, and watch over a few hours as the water evaporates, condenses into droplets on the bag, and “rains” down the sides. Point out each stage of the cycle as it happens. This hands-off experiment shows the full water cycle in real time and pairs wonderfully with books about rain and clouds.
Make a Wind Vane: Tape a paper arrow to the end of a plastic straw, then push a pin through the middle of the arrow into the eraser of a pencil stuck in a lump of playdough or a plate for a base. Take it outside and watch which way the arrow points as the wind blows. Have your kids record the direction a few times a day and talk about how wind affects weather and outdoor play. It’s a simple tool that turns everyday breezes into a mini meteorology lesson.
Homemade Barometer: Stretch a balloon over the mouth of a clean jar and secure it with a rubber band, then tape a straw horizontally across the top of the balloon. Place an index card next to it and mark the straw’s starting position. Set it somewhere away from direct sun or vents and check it daily—rising or falling straw means changing air pressure (and possibly rain coming!). This one helps kids predict weather changes and understand how atmospheric pressure works without fancy gadgets.
Cloud in a Jar: Fill a clear jar about one-third with warm water, swirl it around to create humidity inside, then place a few pieces of ice on top of the lid. Next, you’ll spray a quick burst of hairspray before capping it tightly again. This quick experiment ties directly into the shaving cream cloud activity and sparks great conversations about real clouds in the sky.
Make an Instant Rainbow: On a sunny day (or with a flashlight indoors), fill a clear glass or jar with water and place it on the edge of a table so sunlight shines through it onto a white sheet of paper or wall nearby. Adjust the angle until a bright rainbow appears — you can also use a prism to obtain a more concentrated beam. Talk about how sunlight is made of all colors and how water droplets in the air bend the light to create rainbows after a storm. This simple, magical activity shows kids the science behind one of weather’s most beautiful sights and pairs wonderfully with rainy-day or cloud discussions.
Read Next: 45+ Weather Activities for Kids

A Rainy Experiment for Rainy Days
Weather activities like Raincloud in a Jar have a wonderful way of turning ordinary days into little adventures that build young brains and create sweet family memories at the same time. I highly recommend doing this activity on a rainy day to demonstrate what’s happening outside. These simple experiments show kids that science is all around them and that learning can be playful, colorful, and full of wonder.
Whether you’re setting this experiment up on a whim because you’re stuck inside during stormy weather or planning a whole weather-themed week at home, these ideas are flexible, budget-friendly, and packed fun. They encourage curiosity, conversation, and hands-on discovery without needing expensive supplies or complicated setups.
Give the Raincloud in a Jar a try this week, snap a photo of your colorful little storm, and feel free to share in the comments how your kids described the rain in their jar — I’d love to hear their creative reactions! Check out the following link to discover more science activities for kids. Happy experimenting!
Read Next: 25 Indoor Activities for Kids
Rain Cloud in a Jar
AT A GLANCE ACTIVITY INSTRUCTIONS
Materials
- A clear jar or tall glass (a wide-mouth mason jar works best so everyone can see the action from all sides)
- Water (room temperature is perfect)
- Foam shaving cream (the fluffy white kind — skip the gel version, as it doesn’t create a good cloud)
- Food coloring (blue works great for realistic rain, but any colors your kids love are fine)
- A dropper or plastic pipette (a spoon can work in a pinch, but a dropper is more fun for little hands)
- Optional: A tray, baking sheet, or shallow dish to catch drips and keep your table clean
- Optional: Small cups or bowls for mixing and diluting the food coloring
Instructions
- Fill the jar about three-quarters full with water. This creates the open “sky” space underneath your cloud.
- Spray or scoop a generous, fluffy layer of shaving cream right on top of the water. Mound it up a bit above the rim — the thicker and puffier the cloud, the longer and more dramatic the rain will be.
- If your food coloring is thick, mix a few drops with a teaspoon of water in small cups. This makes it easier to drop and helps prevent super dark stains.
- Hand the dropper to your kids and let them gently squeeze drops of color onto the top of the shaving cream cloud.
- Watch together as the color slowly seeps through the foam (just like water collecting inside a real cloud) and then begins to drip down in colorful rain streaks into the water below.
- If the rain slows down, add a few more drops or gently stir the top of the cloud with the dropper — kids love experimenting to make their own mini storms!
Recent Posts on the Blog