

ARTWORK ORGANIZATION BY…THE GRINCH!
Kids’ art storage simplified.
— By Julie Hodos on May 16, 2025; Updated on January 13, 2026.
This post may contain affiliate links. Please refer to our disclosure policy.
Do you struggle with endless piles of artwork? In your child’s eye, every artwork piece is a masterpiece. Every picture that is colored, painted, or drawn must deserve a spot on the fridge, but what about the one that was there before? To be sure, that masterpiece can’t just be chucked into the trash. Imagine the horror on little Cindy Lou Who’s face.
Table of Contents

I no longer struggle with the mountains of arts and crafts, and you won’t have to struggle with your kids’ art storage after today either. The system takes little effort to implement, and we also find inspiration from Dr. Seuss’ character, The Grinch! I know this works because it’s how I do it, and I’m a homeschooling momma. As a result, I receive artwork and crafts daily, practically all day.
Why You Need a System for Your Kids’ Art Storage
Every child down in craft-ville liked artwork a lot…But the Momma who lived just north of craft-ville did NOT! Just kidding, I do love my kids’ artwork and love that they have a passion for creating. I find the same enjoyment when making something with my hands too. But the problem is when it starts to take over the house or causes me undue brain space to keep track of it.
By implementing a method for your kids’ art storage, you’ll be able to keep what is really special and discard the rest with no stress. This system works well for both you and your child too. This is because you’ll never have to worry about little Cindy Lou finding her picture of scribbles in the trash. Also, if you’re a sentimental momma, you’ll have a two-step system to determine whether or not that piece of artwork is worth saving.
If you homeschool, this is also an excellent way for maintaining portfolios. Before using this system, the artwork pieces I actually thought were worth keeping went straight into the binder. Consequently, I wouldn’t lose it, but we were never able to enjoy it either. Currently, I display artwork proudly and then it finds its place into the kids’ art storage binder.
The Kids’ Art Storage System That Works
The Display Options
Firstly, you must establish a location where artwork is displayed. There are many options for displaying and what will qualify a piece to be on display or not. Consider how many children you have, the amount of artwork you receive from them, the space you have, and your own personal preference.
If you do not have the space to display a lot of pieces or you prefer to keep it simple, then you can use something like a gallery wall of picture frames. There are two options. First, thrift picture frames, paint them one cohesive color, and hang on the wall. Or buy frames specifically for this purpose. These usually look like shadow boxes for multiple pieces. Here is an example, Kids’ Art Frames.
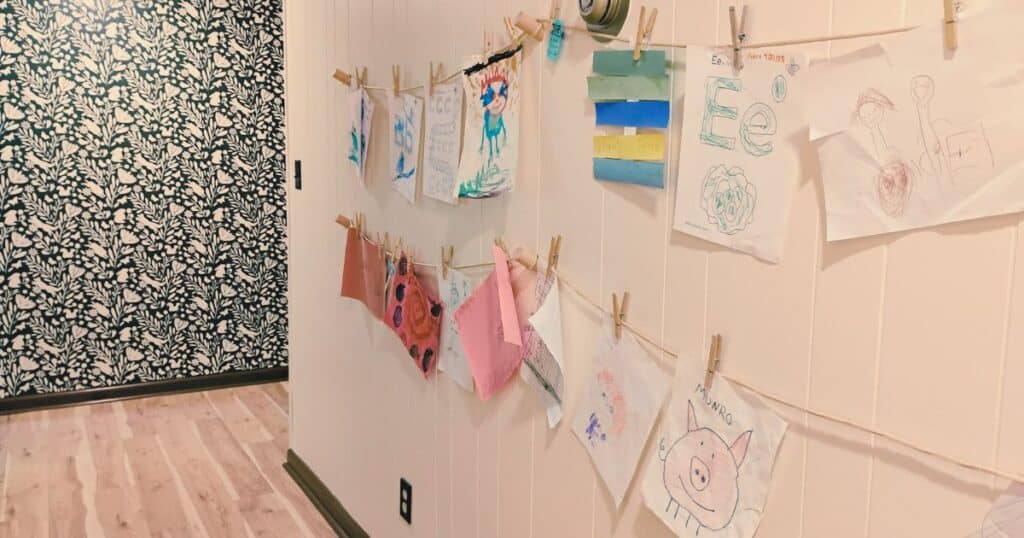
On the other hand, if you have the space or simply receive a lot of artwork, then consider a rope gallery. In our home is a long hallway leading to our boy’s room. Rope is strung between wall hook pegs, allowing me plenty of space to hang the boy’s art. Still looking for inspiration? Here are 21 Kids’ Artwork Displays to choose from.
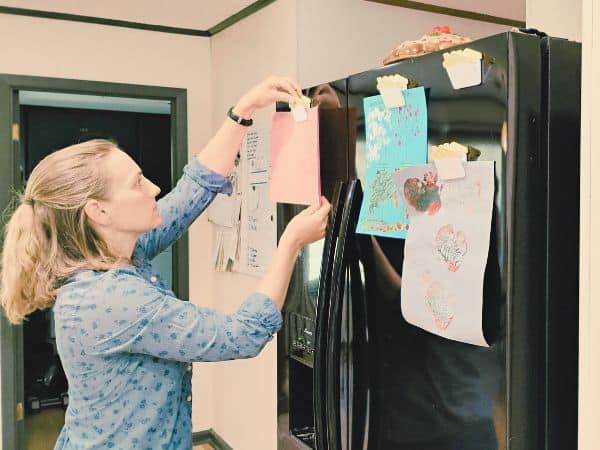
The Fridge
To clarify, not all pieces end up here. Some go straight into the “goodbye tray” – more on that in a minute. And a very, very select few make it onto the fridge. I have one magnet for each boy that allows each of them to display one piece of artwork front and center in our kitchen.
I hand made our magnets with clips that were given to me from family. Luckily, they get them from work for free. Getting creative and using a lot of elbow grease, I used a magic eraser to take off the company’s message. Then I spray painted the top yellow to match my kitchen. I did find similar colorful ones online you can check out here, magnetic fridge clips.
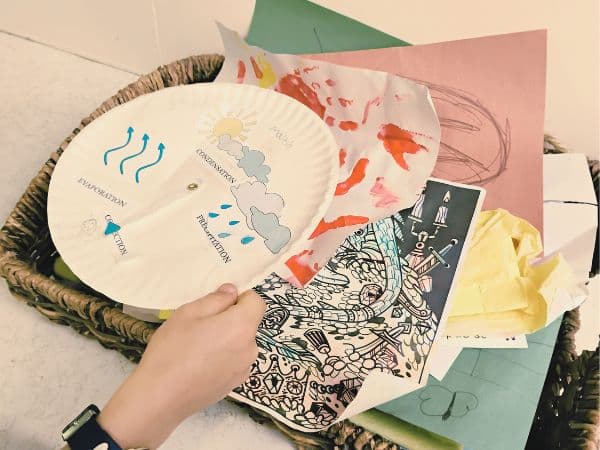
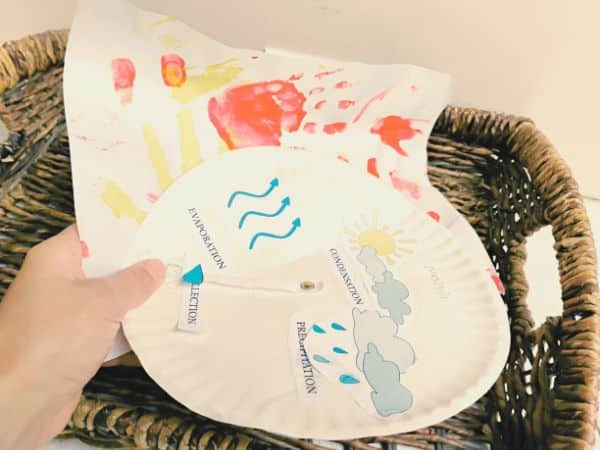
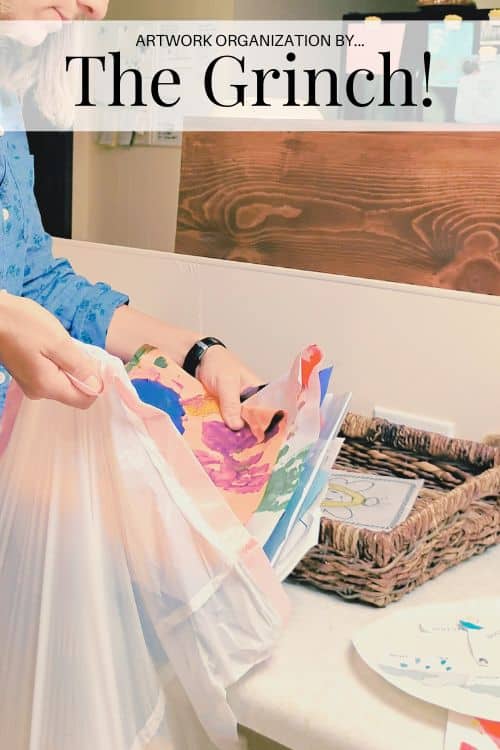
The Goodbye Tray
As promised, let’s talk about the goodbye tray. You might have noticed a hierarchy process that the kids’ art storage filters through. And I know it sounds way more complicated than it actually is. If a piece is worthy, it makes it onto the fridge. When a new, worthy piece goes up, the old comes down. The rope gallery becomes its new home or it goes straight into the portfolio binder.
But what happens if a piece isn’t even good enough for the rope gallery? It obviously isn’t going to make it to the fridge. So what do we do with it? If I chuck into the trashcan my little Cindy Lou would be devastated. That is where the goodbye tray comes in. I do not call it the goodbye tray in front of my boys. The Art Tray is its code name.
Where to Place the Goodbye Tray
The goodbye tray is a phenomenal addition to any home’s space because you can sit it near the entryway door. Then, you can toss any arts and crafts brought home from church or extracurricular activities in it. Additionally, I can safely toss a craft in the goodbye tray, and if my child asks for it a few days later, guess what! I can hand it back. Similarly, you can toss junk mail in there – win, win! But as a quick disclaimer, let your goodbye tray figure out where it needs to go. You’ll pretty quickly know where you want it after a week or so.
For instance, I realize that I am handed a lot of artwork in the kitchen. Probably because I spend a lot of time in there. Luckily, my kitchen and main entryway door are near each other. Naturally, the goodbye tray has landed in-between the two spaces and is easily accessible from each. And so when all these pieces, that aren’t worth my time to hang, are given to me, I “ooh” and “aah” over them. But then I toss it into the goodbye tray. If my child wants it hung up, I will, but they do not always request that.
Inspiration from the Grinch
Time passes and artwork after artwork has accumulated. So far, you have stuck to your kids’ art storage plan. It either finds its home on the rope gallery, into the goodbye tray, or that coveted spot on the fridge. But now the rope gallery is overflowing, and so is the goodbye tray. What do we do? Most importantly is that we take a little inspiration from the Grinch.
To begin, I make sure that my kiddos are sleeping, distracted by television, or out of the house with Daddy. “‘This is stop number one,’ the old Grinchy Claus hissed and he climbed to the roof, empty bags in his fist.” Stop number one is the trash bags. With my empty bag in my fist, I approach the goodbye tray and stuff the tree up! Oh no, sorry, I’m getting my stories all jumbled here. I stuff all the artwork into the trash bag with glee.

Clear Off the Rope Gallery Strategically
“Then he did the same thing to the other whos’ houses.” It’s true, your next stop is by the rope gallery wall. Not all pieces will go into the trash bag however. Are there any pieces you’re struggling to get rid of just yet? If so, take these down and place them in the goodbye tray. You want to keep several pieces of artwork for the goodbye tray anyways. Not too many but enough. The rest get stuffed into the trash bag, and a select few go into your child’s homeschool portfolio.
“Up the side of Mt. Crumpit, he rode with his load to the tiptop to dump it!” Now it’s time to journey to Mt. Crumpit…I mean the garbage bin. That artwork is not going to be found in the kitchen trash can or sitting around anywhere. The Grinch knew he needed to take it far away and dispose of it. And so we shall too. Take it straight out to the garbage bin and throw it out.
Since we’re talking art, let me paint the scene for you. The rope gallery wall is empty, the goodbye tray has several pieces in it, and all the evidence has been successfully dumped off Mt. Crumpit. What happens when they come home and notice that the rope gallery is empty? Chances are they won’t, my kiddos never have. But maybe yours do. Without making a big fuss, tell them (don’t show them) that the rope gallery was overflowing so you placed the beautiful masterpieces into the art tray (remember we don’t want to call it the goodbye tray, they may catch on). Let them know that you would love some new artwork to hang up though.
Chances are your child will not go out and look in the goodbye tray. Instead, they will probably get to work making new pieces. And don’t worry, if you made your rope gallery large enough, then their sudden burst of creativity will be used up well before it fills up. Also, since the goodbye tray still has some pieces in it, they won’t notice that the pile size has significantly decreased. At least my kiddos never have.
Why This Kids’ Art Storage System Works
Why I Love This System for Homeschooling
As a child completes each artwork piece, individually it looks like they have demonstrated a new skill. Such as, their first attempt to draw a face with creepy hollow eyes, protruding teeth, or hair that stands up straight. Individually, we think each one deserves a place in the portfolio binder. But that quickly adds up.
When we allow artwork to accumulate on the rope gallery, we can then assess several pieces completed over the course of a month and choose just one or maybe two that are actually worthy to be kept.
Why This Kids’ Art Storage Solution Works Even If You Don’t Homeschool
All the arts and crafts that come home from extra-curriculars and church would quickly take over our home if I didn’t use this kids’ art storage solution. And yes, planned time to haul it all out to Mt. Crumpit to dump it! I’m sure you have the same problem with artwork or even worksheets that come home from school. There is simply no reason that all these extra arts and crafts and papers should be draining. Instead, whip your kids’ art storage into shape with this system.

Digital Backups for Extra Peace of Mind
Okay, let’s get real—sometimes even the goodbye tray pieces tug at your heartstrings a bit. That’s where going digital comes in handy. It’s a practical add-on to our system that lets you keep memories without the physical clutter. Think of it as an insurance policy for those “what if” moments.
Start by snapping photos of every piece that comes in, especially the ones headed for the goodbye tray or the trash bag. Use your phone’s camera app or something simple like Google Photos to organize them. Create folders for each child, sorted by year. This way, if little ones ever ask about that one drawing from last summer, you can pull it up on your screen and say, “Look what I found!” No digging through bins required.
For the keepers that make it to the portfolio binder, scan them at higher quality. Apps like Adobe Scan or even your printer’s scanner work great. Upload to cloud storage like Dropbox or iCloud for easy access. Bonus: This digital archive can turn into fun slideshows for family nights or even custom photo books as gifts for grandparents. It’s friendly tech that fits right into our Grinch-inspired stealth mode—save the sentiment, ditch the stack.
And hey, if you’re worried about privacy, just keep it local on your device. The point is, digital backups mean you can be ruthless with the physical stuff without feeling like you’re losing precious memories. Try it next time you’re doing your Mt. Crumpit run; you’ll thank me later.

Handling 3D Crafts and Bulky Projects
So far, we’ve focused on flat artwork, but what about those lumpy clay sculptures, popsicle stick towers, or glittery dioramas? They don’t clip neatly onto a rope or slide into a binder. No worries—our system adapts easily for these bulky beauties.
Begin by designating a “3D display zone.” This could be a dedicated shelf in the playroom, a windowsill, or even a rotating tray on the coffee table. Limit it to 3-5 items per child to avoid overflow. When a new one arrives, the oldest gets evaluated: Is it still special? If not, into the goodbye bin it goes (a larger version of the tray, like a plastic tub).
For storage, use clear bins or shadow boxes for the keepers. Label them by child and date. If it’s super fragile, photograph it from multiple angles before parting ways—digital wins again! And for upcycling fans, repurpose old 3D crafts: Turn a broken sculpture into garden decor or smash it for mosaic pieces in a new project.
I’ve dealt with my share of macaroni necklaces and cardboard castles. The key is consistency: Display proudly for a bit, then archive or release. This keeps your home from turning into a craft museum while honoring their creativity.
Read Next: Create a Craft Drum

Seasonal Rotations and Themed Displays
To keep things fresh and exciting, add seasonal twists to your displays. It’s a practical way to cycle artwork without constant purging, and it ties into holidays or nature for extra fun.
For example, in fall, focus on leaf rubbings or pumpkin drawings on the gallery or the fridge. Come winter, swap in snowmen and holiday cards. This rotation naturally clears space—store off-season pieces in labeled envelopes in the binder. It also inspires kids to create theme-specific art, channeling their energy productively.
Themed displays can be simple: Use colored clips for seasons or add string lights around the rope gallery for festivities. If space is tight, go vertical with a corkboard divided into sections. My family loves this; it makes art feel dynamic, not stagnant. Plus, it’s a sneaky way to phase out older pieces as themes change.
Read Next: Leaf Art for Kids
Common Pitfalls and How to Avoid Them
Even the best systems have hiccups, so let’s troubleshoot some common mistakes to keep your setup smooth.
- Don’t over-display—starting with too much space leads to faster overflows. Stick to what fits your home; scale down if needed.
- Avoid guilt-tripping yourself. If a piece doesn’t spark joy, it’s okay to let go after appreciating it.
- Forgetting the stealth factor: Always purge when kids aren’t watching to prevent tears.
- Watch for inconsistent routines. Set a calendar reminder for monthly cleanouts to stay on top.
Overall, stay practical, and you’ll dodge most issues.
Long-Term Archiving Tips
Once pieces make it to the portfolio binder, think ahead for long-term storage. Acid-free sleeves protect against fading, and label everything with dates and notes (such as, “First self-portrait, age 5”). For multiple kids, use color-coded binders.
Store in a cool, dry spot like a closet shelf. Every few years, review and thin out—kids grow, and what seemed essential might not anymore. Turn archives into memory boxes for milestones, or digitize the whole thing for eternal access.
This step ensures your system evolves with your family, keeping treasures safe without overwhelming your space.

Say Goodbye to Stress
Overall, you don’t have to worry about little Cindy Lou Who finding her artwork in the trash can, and you have designated spaces for the artwork to accumulate. I used to struggle with the mountains of arts and crafts piling up on random counters in our home or being strewn about the floor. And that was from just one kiddo. When my second came along and now I had two kiddos handing me 8 masterpieces in the span of 30 minutes, I knew I needed to figure this kids’ art storage thing out. My kiddos will even put their artwork straight into the tray now, none the wiser what its actual destination is if placed there.
I realize that my Grinch analogy falls short when we come to the end of the story. Since he has a change of heart. But don’t let yourself have a change of heart. Instead, think about the decluttered space and organized home you’ll have. Remember, you’ve implemented a kids’ art storage hierarchy system that will fit your space. Don’t let that all be for naught. Take a little inspiration from north of who-ville. And with an empty bag in your fist, throw the artwork out strategically into the garbage bin. Ultimately, by implementing this kids’ art storage solution, you’ll be allowing more creativity to flow for your child and yourself.
Ready to tame your own masterpiece mountain? Start small—pick one display method today and build from there. Share your tweaks in the comments below; I’d love to hear how it works for you! Let’s keep the creativity rolling without the chaos.
Recent Posts on the Blog


Love it! Will definitely be whistling the Grinch song while I haul the kids old art out to Mt. crumpit from now on! Thanks for the inspiration ❤️